In this second part we’ll be adding an LCD screen to display the current temperature and relay state so that we can monitor the controller we created in the last video without it being connected to a computer.
If you’ve not already followed part one check out the blog post and video here.
Once set up, adding an LCD display will allow us to monitor the current temperature and relay state without having to connect the development board to a PC.
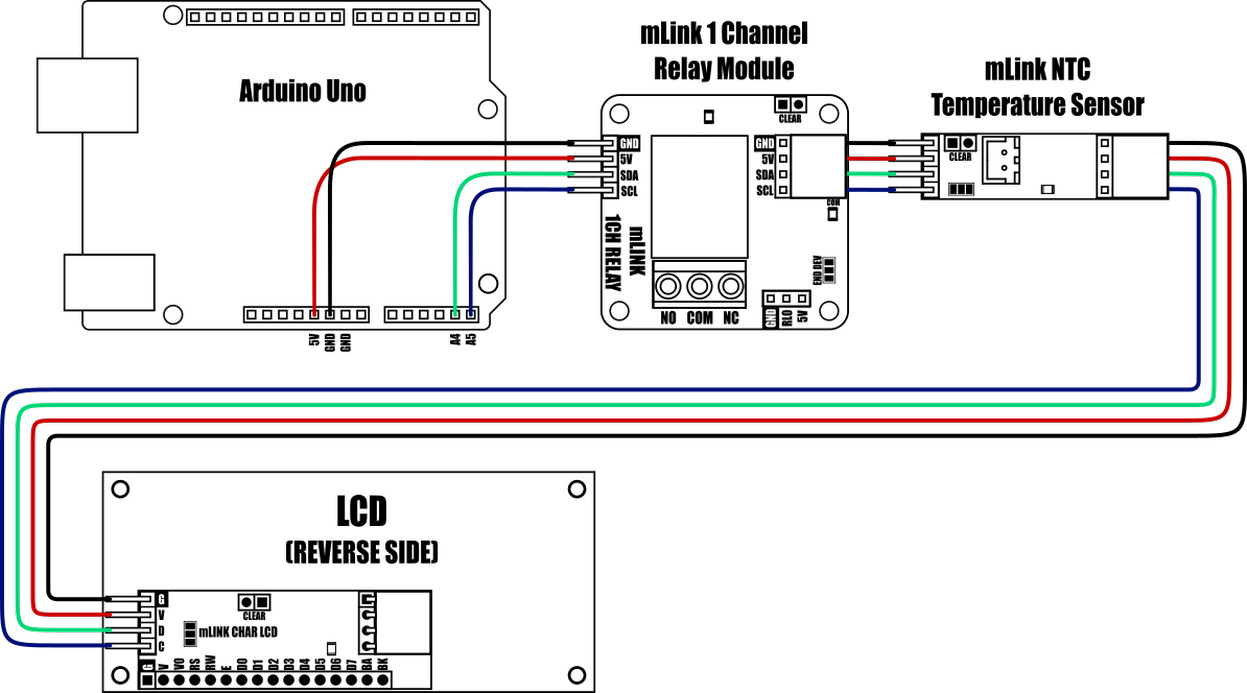
For this video you will need an mLink 1602 character LCD and some of the same dupont cables we used in part one. The code will also work for the larger 20×4 LCD too, as mentioned previously, the choice of screen size will depend on your personal preference.
You’ll also need the items used in the previous video
An Arduino compatible development board with I2C and 5V out. As I said, I’m using the Uno Plus.
The mLink NTC temperature sensor.
The mLink 1 channel relay module.
A Character LCD either 1602 or 2004.
So here’s Part Two
Connections diagram
If you get any errors, or your sketch doesn’t work correctly check the code below.
Arduino Sketch
/* FILE:    mLink_Temp_Controller_Part_2.ino
   DATE:    14/02/24
   VERSION: 1.0
   AUTHOR:  Anita Davies


This sketch uses the mLink library to control a mLink 5V relay (SKU:HCMODU0182)
and mLink NTC Temperature Sensor (SKU:HCMODU0186) and output information to mLink
Character LCD (1602 SKU:HCMODU0190A & 2004 SKU: HCMODU0190B).

Please see Licence.txt in the library folder for terms of use.
*/


#include "mLink.h"              // Include the library

#define RLY_ADD   0x52          // Default I2C address of Relay
#define NTC_ADD   0x54          // Default I2C address of Temp Sensor
#define LCD_ADD   0x56          // Default I2C address of LCD display


float onSetpoint = 26.0;        // Default ON temperature
float offSetpoint = 28.0;       // Default OFF temperature

boolean relayState = OFF;       // Global variable stores the relay state

mLink mLink;                    // Create an instance of the library

// Initial setup - the code here will run once

void setup()
{
  mLink.init();                 // Initialise the library

  Serial.begin(9600);           // Set data rate in bits for serial transmission
}

void loop()
{
  float temp = getTemp();       // Read current temperature

  updateRelay(temp);            // Get relay status

  updateLCD(temp);              // Update LCD with temp variable

  printStatus(temp);            // Print

  delay(500);                   // Half second delay
}

// getTemp function. Runs read command 10 times. Adds result to "temp" variable.
//Divides sum by 10 to get average before returning result.

float getTemp()
{
  float temp = 0;

  for(byte i = 0; i < 10; i++)
    temp += mLink.NTC_Temp(NTC_ADD);

  temp /= 10;

  return temp;
}

// printStatus function

void printStatus(float temp)
{
  Serial.print("Temperature: ");    // Prints word Temperature: to serial monitor
  Serial.print(temp, 1);            // Prints temperature to one decimal place
  Serial.print("oC, Status: ");     // Prints centigrade sign to serial monitor

  if(relayState)
    Serial.println("ON");           // Prints ON or OFF depending on if/else statement
  else
    Serial.println("OFF");
}


// Prints the current temperature and relay state to the LCD
void updateLCD(float temp)
{
  mLink.cLCD_cursor(LCD_ADD, 0, 0);               // Set the cursor to col 0 row 0
  mLink.cLCD_print(LCD_ADD, "Temp: ");            // Print "Temp: " to LCD
  mLink.cLCD_printFloat(LCD_ADD, temp, 1);        // Print temp in oC to one decimal place
  mLink.cLCD_print(LCD_ADD, "oC ");               // Add oC to Denote Temperature

  mLink.cLCD_cursor(LCD_ADD, 0, 1);               // Set the cursor to col 0 row 1
  mLink.cLCD_print(LCD_ADD, "Relay State: ");     // Print "Relay State: " to LCD

  if (relayState == ON)
    mLink.cLCD_print(LCD_ADD, "ON ");             // Print "ON " to LCD
  else
    mLink.cLCD_print(LCD_ADD, "OFF");             // Print "OFF" to LCD
}


// updateRelay function

void updateRelay(float temp)
{

//For the heating condition we want to turn the relay on when the temperature
//is below the on setpoint and turn the relay off when it is above the off setpoint

  if(onSetpoint < offSetpoint)
  {
    if(temp < onSetpoint)
      relayState = ON;
    else if(temp > offSetpoint)
      relayState = OFF;
  }


//And for the cooling condition we need to turn on the relay if the temperature
//is above the on setpoint and turn it off when it is below the off setpoint

    else if(offSetpoint < onSetpoint)
    {
      if(temp > onSetpoint)
        relayState = ON;
      else if(temp < offSetpoint)
        relayState = OFF;
    }

    mLink.SET_RLY0(RLY_ADD, relayState);  // Update relayState variable
}