


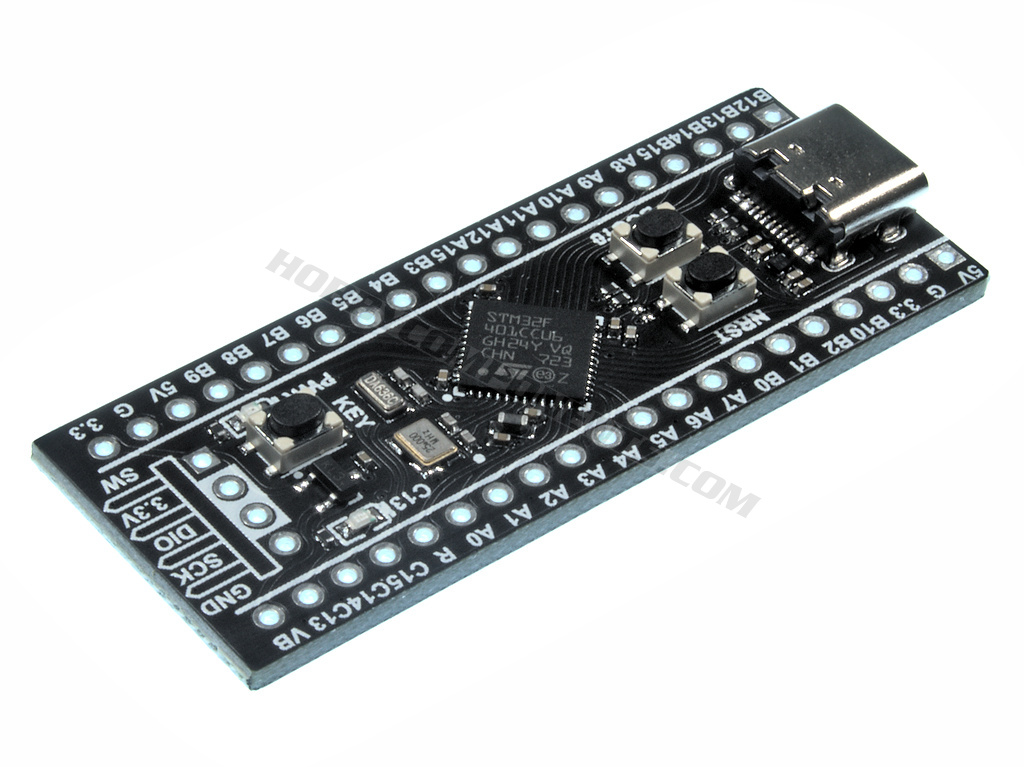
The ‘Black Pill’ range of development boards offer an amazing level of features and processing power when compared to the popular Arduino range of development boards. Even some of the higher end Arduino boards such as the Due simply can’t compete when it comes to raw processing power, memory and features, and yet these little Arm based development boards are available at a fraction of the price, meaning you get the power of an Arm processor for the price of a low end Arduino based board such as a Nano.
However, one big advantage an Arduino has over these boards is the simplicity of use. Using an Arduino is simply a case of plugging it into your computer and uploading a program, or ‘sketch’ as it’s referred to. In less than a minute you can go from taking your Arduino out of the box, uploading the blink test sketch and have it blinking its LED. This is why Arduino have become so popular with beginners or indeed anyone who wants to get their project up and running with the minimum of time and effort.
Fortunately though with recent updates to the Arduino IDE it has gained the ability to add support for non-Arduino development boards and one of the development boards that can now be added to the IDE is the STM32F401 version of the Black Pill.
In the following guide we will take you though the steps necessary to add support for this little board. We’ve tried to make this guide as detailed as possible so at first sight it may look like a complex process but in fact it’s really quite simple and before you know it you’ll have your Black Pill blinking it’s LED just like any other Arduino.
If you don’t already have one of these boards you can of course pick one up from our website here:
https://hobbycomponents.com/st-micro-electronics/1039-stm32f401-black-pill-development-board
Note: This guide is intended for the STM32F401 version of the Black Pill board only. At the time of writing this guide the current board files (V1.8) do not support the STM32F411. However V1.9 is expected to add support for the STM32F411 and when this update is available this guide can also be used to add IDE support for that version.
So let’s get started…
Step 1) If you don’t already have the Arduino IDE installed, download the latest version from the official Arduino website here:
https://www.arduino.cc/en/Main/Software
You can find step by step instructions for installing the IDE here.
Step 2) To program the Black Pill you will also need to download the STM32Cube programmer:
https://www.st.com/en/development-tools/stm32cubeprog.html
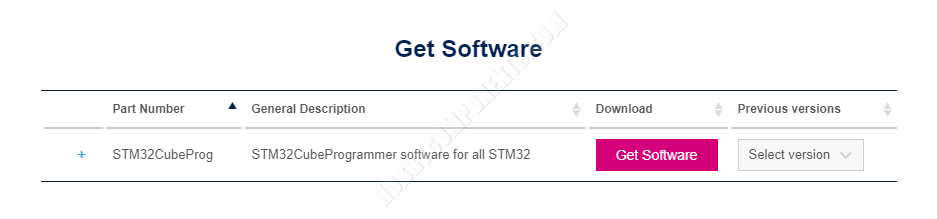
To download the programmer you’ll need to create an account on ST’s website but accounts are free and they have lots of useful stuff for your Black Pill should you plan to use some of its more advanced features.
Step 3) Once downloaded unzip the file and you should have a folder like this:
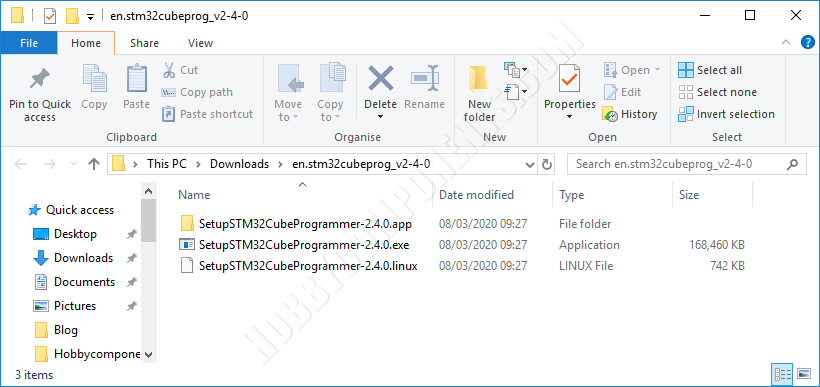
Run the .exe file to begin the install…..
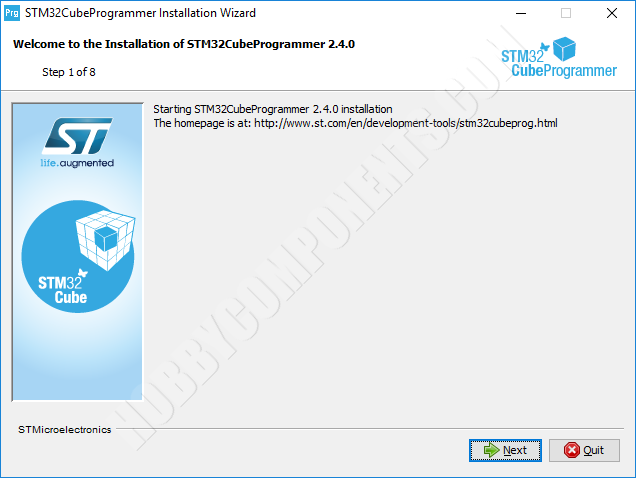
Step through the install process and keep all options set to their defaults and the programmer should start installing…
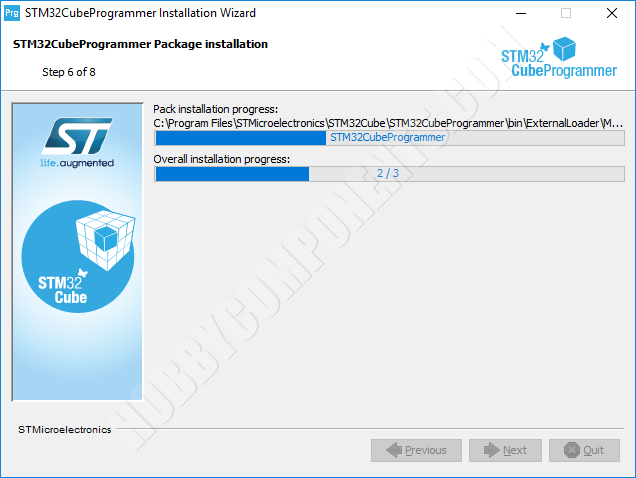
When it has finally installed just close the window, you won’t need to run it again.
Step 4) Once the STM32Cube software has been installed you will now need to add board support to the Arduino IDE. Open up a copy of the IDE. Once loaded click on the tools menu and select preferences. The following window should open…
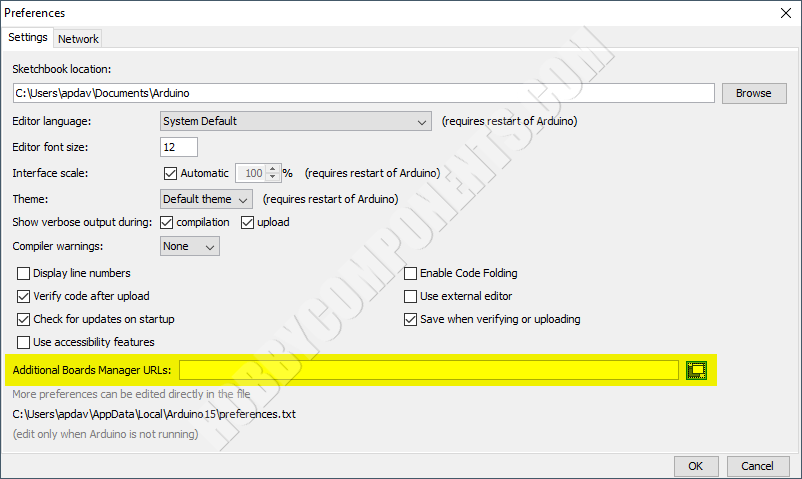
Step 5) In the new window that opens up find the text box labelled ‘Additional Boards Manager URLs’. To the right of the text box is a button. Click it and a new window will open…
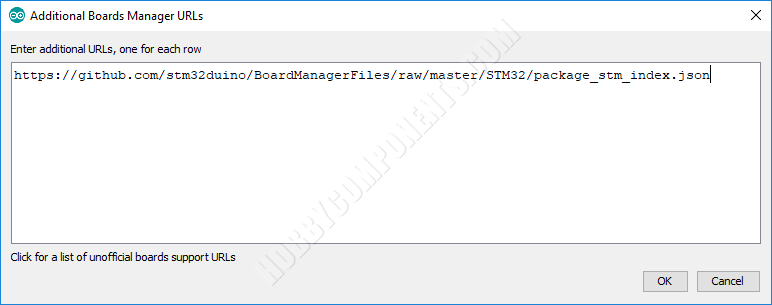
Paste the URL below into it. This will tell the Arduino IDE where to download the board files for STM32 based devices, including your Black Pill. If this window already has some URLs in it just add it to the bottom of the list.
https://github.com/stm32duino/BoardManagerFiles/raw/main/package_stmicroelectronics_index.json
Step 6) After pasting in the URL close the window by clicking the OK button. Then close the original preferences window by clicking its OK button.
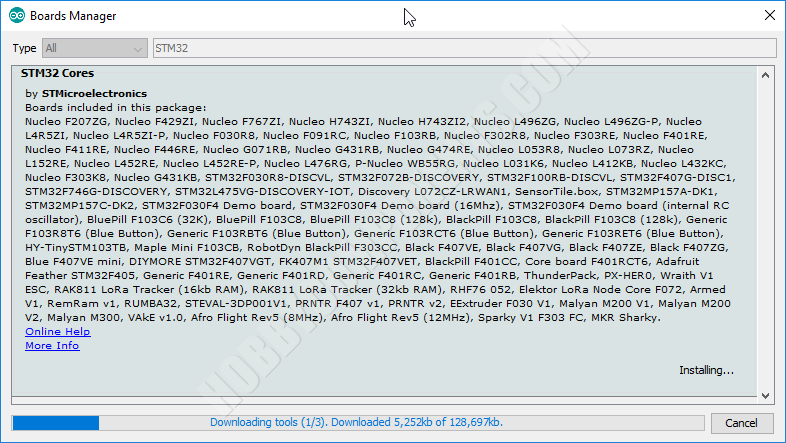
Step 7) Next, in the Arduino IDE click on the Tools menu and select Board->Board Manager. In the new window that opens up type STM32 in the search box at the top of the window…
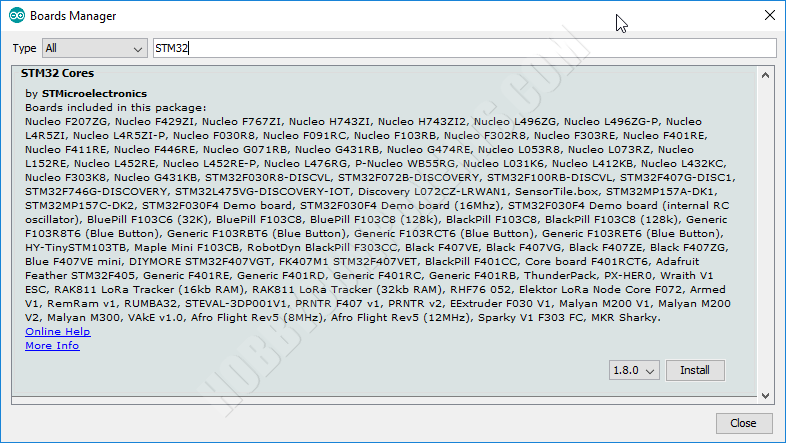
You should see an entry titled ‘STM32 Cores By STMicroelectronics’. If you don’t see this entry then go back to step 3 and check the URL you pasted in the Additional Boards Manager URLs text box. Otherwise click the install button. The Arduino IDE will now install the necessary files for STM32 support. Note that depending on your connection this may take some time.
Step 8) When the board files have been installed close the board manager window to return back to the main Arduino IDE window. Next, open up the example blink sketch be selecting File→Examples→01.Basics→Blink
Step 9) You will now need to tell the Arduino IDE about your Black Pill board. The first step is to select the board type by going to File->Board->Generic STM32 F4 Series.
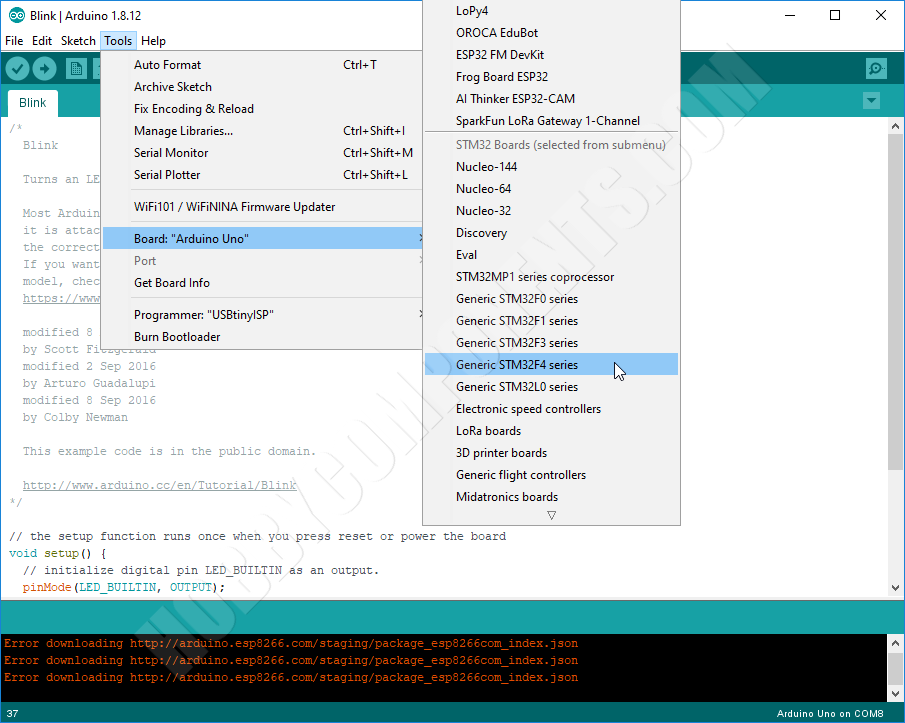
Some extra settings for the board type will now appear under the file menu. Configure these to the following:
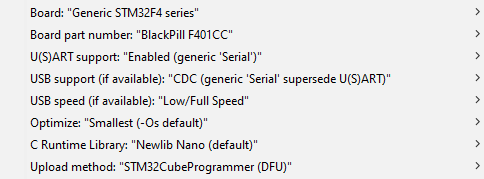
Note: If using the STM32F411 version of the black pill select “BlackPill F411CE” for the Board part number.
Step 10) Now plug your Black Pill board into your computer using a USB Type-C cable.
Step 11) You will now need to put your Black Pill into programming mode (DFU mode). Take a look at your board and you should see two small push buttons, one labelled Boot 0 and the other NRST. Hold down the button labelled Boot0 and then whilst keeping it pressed, press and then release the NRST button. The Black Pill should now be in programming mode.
Note: DFU mode is reliant on the STM32 being close to ambient room temperature (~25oC). If you are repeatedly getting a “Unknown USB device (Device Descriptor Request Failed)” error when trying to enter DFU mode then try changing the temperature of the STM32 IC so that it is closer to ambient room temperature. For example is it is slightly cold try warming the IC with your finger first.
You can find more information about this on our support forum. See FAQ in first post here:
https://forum.hobbycomponents.com/viewtopic.php?f=87&t=2947&p=7538
Step 12) Upload the sketch in the normal way by clicking the upload button (circle with a right pointing arrow in it) in the top left had corner of the Arduino IDE.
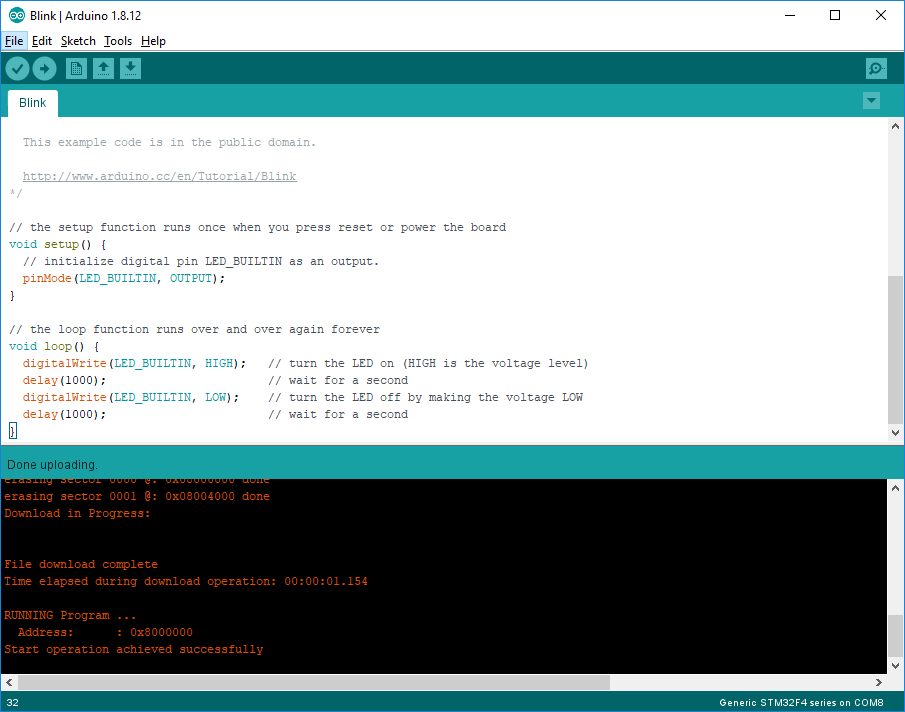
Step 13) The IDE will now compile the sketch and attempt to upload it to your Black Pill. If all goes well you should see a successful upload confirmation and the built in LED on the Black Pill should now start blinking once every 2 seconds.
Descriptions and diagrams on this page are copyright Hobby Components Ltd and may not be reproduced without permission.


I tried your project but after succeful upload my blckpill does not respond any more.
Only the RED LED turns on.
Does this mean the blue LED is no longer blinking? Did it blink before you uploaded the sketch?
hi, I have same issue , blue LED not blinking after successfully compiled
If the LED was blinking before but not after you uploaded the blink sketch, but you are still able to upload sketches, then it’s very likely it’s a settings issue. The settings in the guide are for the boards that we sell. If you purchased your board from somewhere else it may need different settings or it could be that the LED is connected to a different digital pin.
If you did purchase it from us and are still having issues let me know and I’ll contact you via email to try and resolve the issue.
using STM32F401 CCU6
U(S)RT support “Enabled(Generic)” serial
Optimized Smalless (-Os default)
Uploaded method “Stm32cube programmer(DFU)
NO PROBLEM with f411ce…
void setup() {
// initialize digital pin LED_BUILTIN as an output.
pinMode(PC13, OUTPUT);
}
// the loop function runs over and over again forever
void loop() {
digitalWrite(PC13, HIGH); // turn the LED on (HIGH is the voltage level)
delay(100); // wait for a second
digitalWrite(PC13, LOW); // turn the LED off by making the voltage LOW
delay(1000); // wait for a second
}
option:
usb support: CDC generic serial supersede USART
Hello,
I recently purchased one of these boards, but am not having any luck programming, unlike above not even once. I believe I have followed instructions correctly. It enumerates as a CDC device in USBView, but bottom line of IDE says
Generic STM32F4 on Com1
and when uploading Reports
Error: Target device not found
I cannot unselect Com1 ( which is a real device, not Arduino).
Under programmer it says
No programmer found for this device
Any suggestions please.
Steve
>It enumerates as a CDC device in USBView, but bottom line of IDE says
If it’s been correctly put into programming mode it should appear as ‘STM32 Bootloader’ both in USBView and device manager (found under Universal Serial Bus Devices). If it doesn’t appear as that then it would suggest something is amiss there.
>Error: Target device not found
>I cannot unselect Com1 ( which is a real device, not Arduino).
As you’re programming the device in DFU mode the COM port setting shouldn’t be relevant. Are you absolutely sure you have everything configured as per step 9 in the guide?
Edit: I should also point out that this guide is a little out of date and newer versions of the STM32 core now have an actual entry for the F401 BlackPill board. So in the Arduino IDE under Tools->Board Part Number select ‘BlackPill F401CC’ instead. Other than that the guide should work fine.
Hello Andrew,
Just to be clear, I have made no connections to this board other than a USB3 connection.
Trying again, in USBTREEVIEW I get it enumerating as an input HID device (NOT CDC as I said last time?)
Pressing (and holding) BOOT0 nothing changes
Pressing NRST Dissappearrs from view
Release NRST Unknown USB Device (Device Descriptor Request Failed)
Release BOOT0 No change
Also noted that pressing KEY did same thing.
I am 99.99% step 9 is correct, can email screengrabs if you want.
Any suggestions please
Steve
It sounds like a firmware issue (although I wouldn’t rule out a hardware issue). In USBView, when you first plug it in it should say “WeAct STM32 HID Bootloader” under iProduct. Does it do this? Also assuming you’ve never managed to flash it, the blue LED should pulse when first plugged it. Does it do that? This is all of course assuming you purchased it from us.
Just in case its some hardware compatibility issue with your USB 3 port have you tried plugging it into a different port? Preferably a non-USB3 port.
Thanks. Works perfect. First time did not work, then i did Uninstall CubeProgrammer ( I had instaled it in another unit of the Disk), reinstaled in C: and … ! YES ! it worked.
Hello, I have following this tutorial but at the last step when compiling the sketch I do get the following error:
Arduino : 1.8.13 (Windows 10), Carte : “Generic STM32F4 series, BlackPill F411CE, STM32CubeProgrammer (DFU), Enabled (generic ‘Serial’), CDC (generic ‘Serial’ supersede U(S)ART), Low/Full Speed, Smallest (-Os default), Newlib Nano (default)”
exec: “{runtime.tools.STM32Tools.path}/tools/win/busybox.exe”: file does not exist
Any clue how to solve this?
It looks to me like either the STM32 core files (installed via board manager) haven’t installed correctly or, the Arduino IDE is looking for them in the wrong place.
Could you possibly be running the Arduino IDE under a different user name to the one used to do the installation process? If not check to see if the file it’s complaining about is actually there. It should be in the following location:
C:\Users\\AppData\Local\Arduino15\packages\STM32\tools\STM32Tools\1.4.0\tools\win\busybox.exe
Note that you’ll need view ‘hidden items’ enabled in Windows explorer to see the AppData folder. If that file is not there then try uninstalling and then re-installing the core files via board manager again by repeating step 7.
Hi. I managed to download and run the blink program first time. However on the second attempt, when I put the board into programming mode windows informs me that “USB device is not recognised” and doesn’t show in device manager. The upload fails with a “Target device not found” message in Arduino IDE. I’ve tried differnt USB ports with the same result. I’m wondering if it’s a bootloader issue? Please advise. I’m far more familiar with ST’s nucleo boards, but want to branch out into the Arduino world and have just hot the learning curve. Thanks.
The only things I can think of that could cause that issue is either the bootloader getting wiped, a sketch changing some internal configuration, or a physical hardware issue. If all you have done is follow the guide then it shouldn’t be possible for it to be either the first two.
Is the blink sketch still running ok ? If so then when the sketch is running it should also appear as a serial COM port. Do you see the COM port in device manager? That will at least help point to if it is a hardware issue or not. Also just to confirm, I believe your using the STM32F411CE version of the blackpill?
Hi. Thanks for getting back to me and appologies for taking so long to reply. I am indeed using the STM32F411CE. Unfortunatley since my original post I think I must have got the BOOT0 and NRST buttons mixed up so I’m guessing I have now overwritten the bootloader. If you can advise on the best way to recover, that would be greatly appreciated. In the meantime, happy Christmas to you and yours and lets hope the new year’s been worth the wait! Btw please note a change of email necessitated by the UK’s departure from the EU.
Sorry, I must have been having a bit of a dumb moment when I typed my last message. The DFU bootloader is built into the 411 and so you won’t have been able to erase it by pressing the buttons in the wrong order. So the issue must be something else. Just to be sure can you confirm that when you put it into DFU mode by holding down the boot0 button then pressing and releasing the reset button, then releasing the boot0 button, it’s defiantly not appearing as ‘STM Device in DFU mode’ in Windows device manager? And also when in normal running mode, is the blink sketch running?
Unfortunately the comment section of this blog post isn’t ideal for product support so I may have to email you directly if that’s ok.
Happy Christmas to you too BTW
I am having problems programming an STM32F401 black pill purchased from you. Looking at the chip I see it is a CCU6 variant.
Using a utility called USBLogView I can see it identified as USB ID 0483 572a when plugged in and device type HID, description WeAct Studio HID Bootloader.
When I put it into program mode, as you describe, the device is shown as being unplugged and then a new device plugged in when I release the Boot0 button. This new device has ID 0000 0002, device type Unknown, description Unknown USB Device.
This would appear to be the problem with programming it. Your help would be appreciated.
Hi Stuart, this is really an odd issue. To get it into DFU mode is simply a case of resetting the device whilst holding down the boot0 button. It kind of sounds like a hardware problem except for the fact that the USB interface is working fine when in normal running mode. Beyond suggesting to try a different USB cable or a different computer if you have access to one there is not much else to try. Failing that what I would like to do is send you out a replacement but get the one you have back so that I can take a look at it myself. We can do this with very little inconvenience to yourself so If you’re still having no luck can I email you directly so arrange this?
Hi Andrew
Thank you for your rapid reply, especially over Christmas.
When I plug it in the red LED comes on and the blue one strobes slowly. Put it into DFU mode as you describe and the blue LED goes out, and the USB connection changes as I have described.
Sure, feel free to email me and I can send you some screen shots to show you what is happening.
Everything you describe (apart from the programming mode issue) is exactly what I would expect to happen. I think it’s likely that this is unfortunately a hardware issue so I’ve just sent you a email to arrange for a return.
The device comes up as a “Unknown USB device (Device Descriptor Request Failed)”. The blink sketch isn’t running. Yes, please contact me directly – we’ll run out of response space otherwise!
Hi! when entering bootloader mode the device comes up as a “Unknown USB device (Device Descriptor Request Failed)” what to do?
As you’re the third person to report this behaviour I’ve done a little bit of digging and may have found the cause. There is a requirement for STM32 devices supporting DFU mode that to reliably boot it into this mode they must be close to ambient room temperature. I.e. close to 25oC otherwise their internal oscillator will not be accurate enough for USB communication. This requirement only affects DFU mode and not it’s normal running mode which I am assuming is what your experiencing.
I will post a more detailed reason for this later on but for now if it’s possible that you device is in an environment where is could be a bit too hot or too cold, could you try it again when it’s at a temperature closer to 25oC. For example if it’s too cold try warming the chip up a little using your finger.
well it works with a little finger job, like you said.
weird but the bluepill to behaves uncomprehensive, sometimes after uploading a sketch the com port disappears
Thanks for confirming. I’ve now added a note about this in step 11 of the guide.
For the Bluepill issue as we don’t sell that module I can’t give advise on it I’m afraid but it is my understanding that the Bluepill modules have and incorrect pullup resistor fitted to the USB D+ line that can cause USB reliability issues.
Hi! I just recently purchased a Blackpill (STM32F411CE) and ran into problem uploading program thru USB-C. I came across this tutorial, did the steps but only got mine to work only on the first time. Very similar situation to Mr.Dan Clark (Dec.5). After the first successful upload, the Arduino IDE will see the dev/ttyACM0, but if you put the board into DFU-mode and look at the Port setting it will disappear. I spend days trying to figure this..
Just now, I found the ff steps to work..
1. While the blackpill is still in running mode (not DFU-mode), open Tools then select your Port (mine is /dev/ttyACM0).. KEEP HOVERING YOUR MOUSE POINTER TO TOOL TO KEEP IT OPEN…
2. Put the blackpill into DFU-mode (press/hold BOOT0 > press NRST > unpress NRST > unpress BOOT0).
3. Click the UPLOAD button.
I don’t know if others have the same blackpill DFU-mode problem as mine or if this is also the solution for them but this is how I get mine to work.
I’m having trouble installing the Cube Software. The ST site has moved on since your tutorial was created. The STM32CubeProgrammer is now at version 2.7 and there are 32 bit and 64 bit Windows Versions available. I downloaded both the 64-bit version and the 32-bit version but when I attempted to install either I had installation errors. I think that I may need a later version of Java, I’m currently on Version 8. These are not your problems but I’m a bit stuck.
com.izforge.izpack.api.exception.IzPackException: An error occured
in java.lang.Thread.run() at Thread.java:748
in com.izforge.izpack.installer.unpacker.UnpackerBase.run() at UnpackerBase.java:241
in com.izforge.izpack.installer.unpacker.UnpackerBase.unpack() at UnpackerBase.java:319
Caused by: com.izforge.izpack.api.exception.InstallerException: File execution failed
in com.izforge.izpack.installer.unpacker.UnpackerBase.unpack() at UnpackerBase.java:299
in com.izforge.izpack.installer.unpacker.UnpackerBase.unpack() at UnpackerBase.java:483
in com.izforge.izpack.installer.unpacker.UnpackerBase.executeFiles() at UnpackerBase.java:959
It does look like a java issue to me too. Just to be sure I’ve uninstalled my current version of the STM32CubeProgrammer (V2.5) and installed the latest (V2.7) and it worked fine for me. It comes with its own version of Java and I would suspect it would use this version for the installation process if it needed it but I can’t be sure.
I suspect that your current installed version of Java is somehow causing the issue. If you’re happy to uninstall your current version of Java you could try uninstalling it then installing the cube software again with no Java installed.
Btw assuming you’re using a 64 bit version of Windows then use the 64 bit version of the cube software.
Andrew, Thanks for the help. I’ve now manged to get it working, currently using the 32-bit version. I suspect that there is a problem with one or more of the paths in the environment variables on my PC since at the beginning of each compile I get this message:
The system cannot find the path specified.
——————————————————————-
STM32CubeProgrammer v2.7.0
——————————————————————-
I also see a Path Not Found message from one of the cmd line windows on Windows 10 startup. I’ll check further.
Derek
hi !!
I would like to know how to operate the flash that I soldered on the 8 m-byte U3 pads …. has anyone done any tests ???
I found the best solution for both Blue and Black Pill is to spend a few bucks buying a good ST-Link (clone) and then use Platform IO in with ‘Arduino’ settings – then you can still use all the Arduino libraries as before but it runs reliably in a proper IDE and with ST-Link you can do all the great single step debugging and viewing of variables etc.,