


How to get started with our serial seven segment display module and make a cool scrolling display.
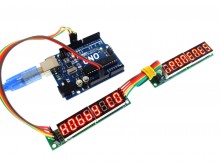
This 8 Digit Seven Segment Display Module takes advantage of the Maxim MAX7219 driver IC to allow you to driver its 8 seven segment LED’s using just 3 digital pins. The display removes all the awkward things associated with driving seven segment displays such as multiplexing, refresh rates, current limiting etc. Not only that, headers situated at both ends of the module allow you to daisy-chain multiple modules together to make even longer displays.
What you will need:
- One or more of the serial seven segment modules
- An Arduino such as this one
- Male to female dupont cable to connect the module to your arduino
- And if you are using more than one module, some female to female Dupont cable
To take care of the software side of things we have created a library that makes controlling these displays as simple as possible.
You can download the library from our support forum here
Or from Github here.
You will need to download and unzip this library to the Arduino development environments library area, which can be found in the following locations.
On Windows:
My Documents\Arduino\libraries\
On Mac:
Documents/Arduino/libraries/
or similarly for Linux.
Connect the module(s) to your Arduino as follows:
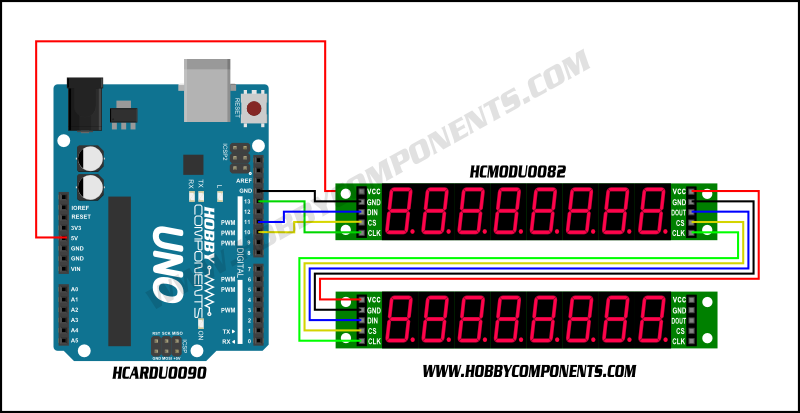
You can use any available digital pins on your Arduino, but you’ll need to change the pin references in our example sketches:
[cpp]
/* Digital pins used for driving the module */
#define DIN 12
#define CLK 11
#define LOAD(CS) 10
[/cpp]
Driving more than one display
By default the library assumes you will only be driving one module. If you plan to drive more than one you’ll need to make a small change to one of the library files.
In the HCMAX7912 library folder, locate the file called HCMAX7219.h and open it in a text editor.
Then find this line towards the top of the file:
[cpp]
#define NUMBEROFDRIVERS 1
[/cpp]
This sets the number of modules you have connected. Just change the number on the end to match the number you have and then save the file.
Displaying text
[cpp]
HCMAX7219.print7Seg("TEXT STRING", Offset)
[/cpp]
The HCMAX7219 library includes a print function that will allow you to display alphanumeric text and numbers at any position on the modules. If the text runs over the display area of one module, the library will automatically run it on to the next connected module. The offset parameter sets where on the module(s) display you would like the text to start. Here are some examples:
HCMAX7219.print7Seg(“TEXT STRING”, 1) The first digit of the first module
HCMAX7219.print7Seg(“TEXT STRING”, 8)Â The last digit of the first module
HCMAX7219.print7Seg(“TEXT STRING”, 9)Â The first digit of the second module
HCMAX7219.print7Seg(“TEXT STRING”, 16)Â The last digit of the second module
You can also display integer numbers with this command:
[cpp]
HCMAX7219.print7Seg(Value, Offset)
[/cpp]
Or integer numbers with a decimal point:
[cpp]
HCMAX7219.print7Seg(Value, Decimal_Position, Offset)
[/cpp]
Example sketches:
So, with your modules(s) connected, let’s see how we can use this library to display some text. Cut and paste the code below and download it to your Arduino:
[cpp]
/* FILE: HCMODU0082_Serial_7_Segment_Module_Example1
DATE: 19/03/15
VERSION: 0.2
REVISIONS:
12/03/15 Created version 0.1
19/03/15 Updated to work with V0.2 of the HCMAX7219 library
This is an example of how to use the Hobby Components serial 8 digit seven 7
segment display module (HCMODU0082). To use this example sketch you will
need to download and install the HCMAX7921 library available from the software
section of our support forum (forum.hobbycomponents.com) or on github:
(https://github.com/HobbyComponents)
The library assumes you are using one module. If you have more than one module
connected together then you will need to change the following line in the
libraries HCMAX7219.h header file to the number of drivers you have connected:
#define NUMBEROFDRIVERS 1 <- Change this number
PINOUT:
MODULE…..UNO/NANO…..MEGA
VCC……..+5V……….+5V
GND……..GND……….GND
DIN……..11………..51
CS (LOAD)..10………..10
CLK……..13………..52
You may copy, alter and reuse this code in any way you like, but please leave
reference to HobbyComponents.com in your comments if you redistribute this code.
This software may not be used directly for the purpose of promoting products that
directly compete with Hobby Components Ltd’s own range of products.
THIS SOFTWARE IS PROVIDED "AS IS". HOBBY COMPONENTS MAKES NO WARRANTIES,
WHETHER EXPRESS, IMPLIED OR STATUTORY, INCLUDING, BUT NOT LIMITED TO, IMPLIED
WARRANTIES OF MERCHANTABILITY AND FITNESS FOR A PARTICULAR PURPOSE, ACCURACY OR
LACK OF NEGLIGENCE. HOBBY COMPONENTS SHALL NOT, IN ANY CIRCUMSTANCES, BE LIABLE
FOR ANY DAMAGES INCLUDING, BUT NOT LIMITED TO, SPECIAL, INCIDENTAL OR
CONSEQUENTIAL DAMAGES FOR ANY REASON WHATSOEVER. */
/* Include the HCMAX7219 and SPI library */
#include <HCMAX7219.h>
#include "SPI.h"
/* Set the LOAD (CS) digital pin number*/
#define LOAD 10
/* Create an instance of the library */
HCMAX7219 HCMAX7219(LOAD);
void setup()
{
HCMAX7219.Init();
}
/* Main program */
void loop()
{
/* Clear the output buffer */
HCMAX7219.Clear();
/* Write some text to the output buffer */
HCMAX7219.print7Seg("HELLO !!",8);
/* Send the output buffer to the display */
HCMAX7219.Refresh();
while(1);
}
[/cpp]
[cpp]
/* FILE: HCMODU0082_Serial_7_Segment_Module_Example2
DATE: 19/03/15
VERSION: 0.2
REVISIONS:
12/03/15 Created version 0.1
19/03/15 Updated to work with V0.2 of the HCMAX7219 library
This is an example of how to use the Hobby Components serial 8 digit seven 7
segment display module (HCMODU0082). To use this example sketch you will
need to download and install the HCMAX7921 library available from the software
section of our support forum (forum.hobbycomponents.com) or on github:
(https://github.com/HobbyComponents)
The library assumes you are using one module. If you have more than one module
connected together then you will need to change the following line in the
libraries HCMAX7219.h header file to the number of drivers you have connected:
#define NUMBEROFDRIVERS 1 <- Change this number
PINOUT:
MODULE…..UNO/NANO…..MEGA
VCC……..+5V……….+5V
GND……..GND……….GND
DIN……..11………..51
CS (LOAD)..10………..10
CLK……..13………..52
You may copy, alter and reuse this code in any way you like, but please leave
reference to HobbyComponents.com in your comments if you redistribute this code.
This software may not be used directly for the purpose of promoting products that
directly compete with Hobby Components Ltd’s own range of products.
THIS SOFTWARE IS PROVIDED "AS IS". HOBBY COMPONENTS MAKES NO WARRANTIES,
WHETHER EXPRESS, IMPLIED OR STATUTORY, INCLUDING, BUT NOT LIMITED TO, IMPLIED
WARRANTIES OF MERCHANTABILITY AND FITNESS FOR A PARTICULAR PURPOSE, ACCURACY OR
LACK OF NEGLIGENCE. HOBBY COMPONENTS SHALL NOT, IN ANY CIRCUMSTANCES, BE LIABLE
FOR ANY DAMAGES INCLUDING, BUT NOT LIMITED TO, SPECIAL, INCIDENTAL OR
CONSEQUENTIAL DAMAGES FOR ANY REASON WHATSOEVER. */
/* Include the HCMAX7219 and SPI library */
#include <HCMAX7219.h>
#include "SPI.h"
/* Set the LOAD (CS) digital pin number*/
#define LOAD 10
/* Create an instance of the library */
HCMAX7219 HCMAX7219(LOAD);
void setup()
{
HCMAX7219.Init();Â
}
/* Main program */
void loop()
{
byte Loopcounter;
byte Position;
/* SCROLL SOME TEXT 5 TIMES BEFORE MOVING ON */
for (Loopcounter = 0; Loopcounter <= 5; Loopcounter++)
{
/* We are scrolling 30 characters of text across the entire display */
for (Position = 0; Position <= DISPLAYBUFFERSIZE + 30; Position++)
{
/* Write the test to the output buffer at the position we require */
HCMAX7219.print7Seg("HCMAX7219 SCROLLING TEXT DEMO ",Position);
/* Send the output buffer to the display */
HCMAX7219.Refresh();
delay(200);
}
}
/* WE CAN ALSO DISPLAY INTEGER NUMBERS */
/* Clear the output buffer */
HCMAX7219.Clear();
/* Write some text and output it*/
HCMAX7219.print7Seg("INT NUM.",8);
HCMAX7219.Refresh();
delay(2000);
/* display an example of a negative integer number */
HCMAX7219.Clear();
HCMAX7219.print7Seg(-1234567,8);
HCMAX7219.Refresh();
delay(2000);
/* Clear the output buffer */
HCMAX7219.Clear();
/* Write some text and output it*/
HCMAX7219.print7Seg("WITH DP.",8);
HCMAX7219.Refresh();
delay(2000);
/* Show the DP in different places. Notice when the DP is at the
beginning the number is padded with a zero */
HCMAX7219.Clear();
for (Position = 1; Position <= 7; Position++)
{
HCMAX7219.print7Seg(-1234567,Position,8);
HCMAX7219.Refresh();
delay(1000);
}
}
[/cpp]


Hello Andrew;
I could not change the pin
#define DIN 7
#define CLK 6
I wrote them into my skectch but not.
which file I need to make changes
Thank you
The library uses the hardware SPI interface. On an Uno/Nano this is fixed to pins 11 & 13. The only pin you can reconfigure is the load (cs) pin.
How do you show variables?
Works great for text!!
You can use integer type variables directly with the print statement:
[cpp]
int Number = 1234;
HCMAX7219.print7Seg(Number,4);
HCMAX7219.Refresh();
[/cpp]
Daisy chaining will not work with the module as delivered, as it incorporates a series diode in the +5v line, so every subsequent module receives a constantly-diminishing suppy voltage. The diode needs to be shorted out to maintain 5V on each device.
Per usarlo come cronometro è possibile ?
Sì, devi solo scrivere lo schizzo
Yes, you just need to write the sketch