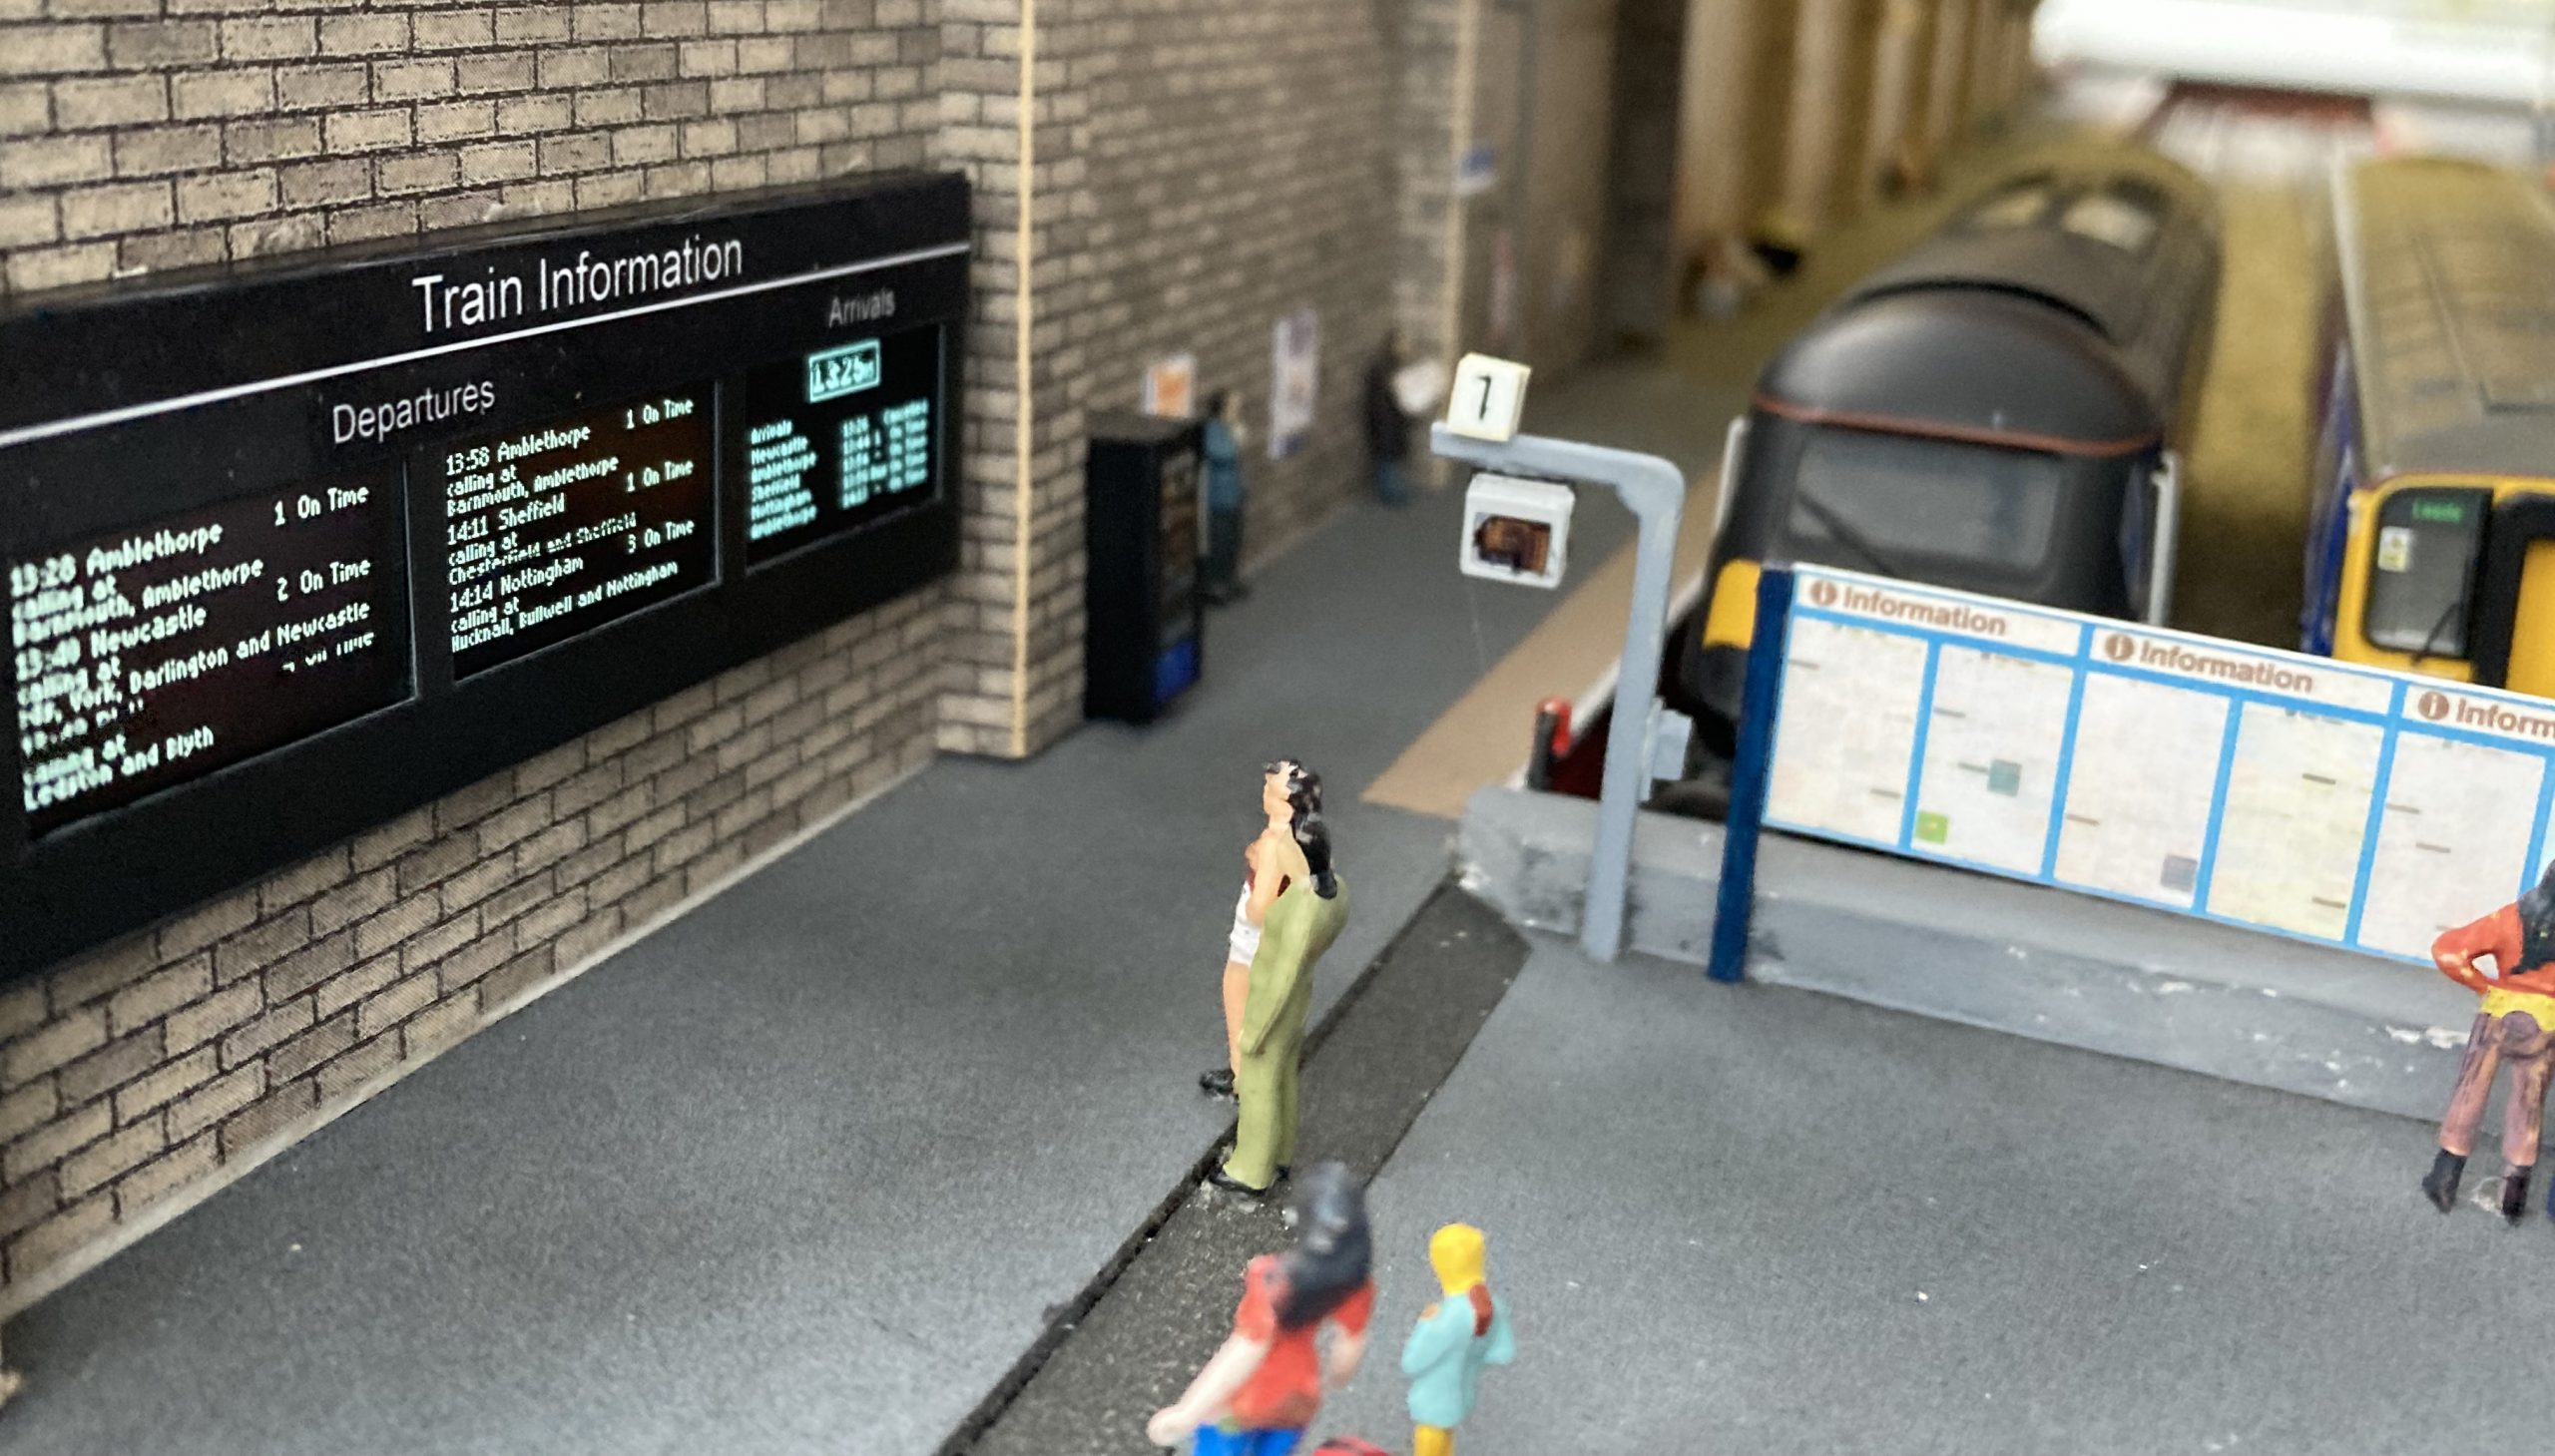
In this series, we are building a main passenger information display for a model railway using a SSD1306 128×64 pixel OLED display module, driven by a nano. So far we have covered how to create a departures board, a combined clock and an arrivals board. In this latest post we will revisit our departures board to increase the information it displays and give it the realistic appearance of main departure boards you find at mid-sized railway stations.
The information display we created in part 3 is a summary departure board. It shows all of the trains with their times and platform numbers. It is missing the station stops that a train makes on-route to it’s destination. Working with the code from part 3, we are going to add in this information to our train services and display it with each of the departures.
Detailed Train Information
We chose to hold the information about our train departures in an object oriented style. This is now proving beneficial. It is very easy to add in the station stops. All we have to do is declare an extra member field in our TrainDeparture struct. We will add char *stops directly after our destination.
struct TrainDeparture
{
  byte minutes;
  byte platform;
  char *destination;
  char *stops;
  byte hours;

  void setup()
  {
    if (minutes > m)  hours = h;
    else              hours = h+1;
    if (hours==24)    hours=0;
  }

  void update()
  {
    if (minutes == m) {
      hours += 1;
      if(hours == 24) hours = 0;
      nextDeparture += 1;
      if (nextDeparture == 6) nextDeparture = 0;
    }
  }
};
When we create our array of departures we can add in the stops after the destination of each train.
TrainDeparture departures[NUMBER_OF_DEPARTURES] = {
  {11, 1, "Sheffield”, “Chesterfield and Sheffield”},
  {14, 3, "Nottingham”, “Hucknall, Bullwell and Nottingham”},
  {28, 1, "Amblethorpe", "Barnmouth and Amblethorpe"},
  {40, 2, "Newcastle”, “Sheffield, Leeds, York, Darlington and Newcastle”},
  {49, 4, "Blyth”, “Ledston and Blyth”},
  {58, 1, "Amblethorpe", "Barnmouth and Amblethorpe"}
};
We can now move on to how we will display these station stops.
Displaying Train Details
The station stops require extra space on our screen. We won’t have room for all 6 of our hourly departures or the clock, so we spread the departures across two screens. A third screen will display the combined clock and arrivals we created in part 4 of this series. Bringing all three of those screen together will be the subject of the next, and final part of the series. For now, we will focus on getting 3 departures on one screen, each displaying their station stops.
The displayClock() function isn’t required for this display. We will remove that code and the line in the loop() that calls it.
As we are not displaying all the departures, we can no longer use NUMBER_OF_DEPARTURES when calling displayDeparture(). We will declare a new global variable departureRows, initialised as 3.
byte departureRows = 3;We use this when we call displayDeparture() in the loop()
for (int i = 0; i < departureRows; i++)
{
  displayDeparture(i);
}
We can now make some changes within displayDeparture(). The screen shows only 3 rows, so these can now be taller.
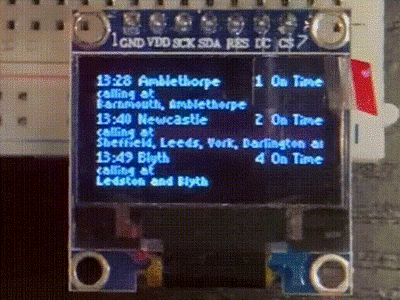
const byte ROW_HEIGHT = 22;We will make use of the extra height to display the station stops. To clarify what is being displayed, we will add the words “calling at” ahead of the stations. This will take up precious pixels, leaving little space on the row to display the station names. We’ll solve this problem by placing “calling at” on one line and the stops on the line below. To squeeze it in, use the very tiny font sharpsharp_5pt. The following is added at the bottom of displayDeparture()
HCuOLED.SetFont(sharpsharp_5pt);
HCuOLED.Cursor(0,(row+8));
HCuOLED.Print("calling at");

HCuOLED.Cursor(0,(row+14));
HCuOLED.Print(departures[train].stops);
As with adding the data, modifying the display code has been a simple process.
There is a small problem however, in that even thought we have used tiny text and given the station stops a whole row, one of our trains calls at more places than can fit on a row. The real railway get round this problem by scrolling the text across the screen. Let’s do the same.
Scrolling Station Stops
To scroll the text we need a distance as to how far to move the text and a way of shifting the text that distance. Two new member fields are required in our TrainDeparture Struct.
byte scroll;
int xPos;
The scroll distance can be a byte, because it is between 0 and 255. The xPos will be a negative value, it cannot be a byte, thus we have declared it an integer. Scroll can be set as we create our departures, while xPos will be calculated. We have one service that has a list of stops too long for the screen. 80 is added to the end of the Newcastle train. (80 isn’t a magic number, I came up with it by trial and error once I had got the stops scrolling).
TrainDeparture departures[NUMBER_OF_DEPARTURES] = {
  {11, 1, "Sheffield", "Chesterfield and Sheffield"},
  {14, 3, "Nottingham", "Hucknall, Bullwell and Nottingham"},
  {28, 1, "Amblethorpe", "Barnmouth and Amblethorpe"},
  {40, 2, "Newcastle", "Sheffield, Leeds, York, Darlington and Newcastle", 80},
  {49, 4, "Blyth", "Ledston and Blyth"},
  {58, 1, "Amblethorpe", "Barnmouth and Amblethorpe"}
};
TrainDeparture also gains another member function, scrollStops() which moves the text one pixel to the left each time it is called, until it reaches the scroll distance. When it is reached the text is returned to its starting position of 0.
void scrollStops()
{
  if (xPos > -scroll) {
    xPos -= 1;
  } else {
    xPos = 0;
  }
}
displayDeparture() needs a modification. We check to see if the stops need scrolling and call scrollStops when they do.
if (departures[train].scroll > 0)
{
  departures[train].scrollStops();
}
HCuOLED.Cursor(departures[train].xPos, row+14);
HCuOLED.Print(departures[train].stops);
The station stops on the way to Newcastle now scroll. Their movement is one pixel each second. This is controlled by the delay(1000) we have placed at the end of our loop() which enables the clock to count in seconds.
The scroll is a bit slow. We could speed it up by changing the code to move two pixels each second. This works, but the scroll effect is no longer smooth. We need to control the speed of the scroll independently from the clock’s one second long beats.
Removing Delays
The use of delay(1000) in the loop limits what else we can do in the sketch. We are going to remove it and replace it with a timer to keep the clock ticking. This allows us the chance to set up other timers to control the scroll.
The function millis() returns the number of milliseconds that have passed since your nano was powered up. To create a time delay we take the millis() value and add to it the number of milliseconds we want pass. Then repeatedly check this value until millis() is greater than it. Only then do we perform the required action. To create our ticking clock we will repeat this process every 1000 milliseconds.
We will add a global unsigned long variable in with our other clock stuff.
unsigned long nextSecond;We will then surround the seconds counter with our timer to ensure that it is only incremented once a second.
if (millis() >= nextSecond)
{
  s=s+1;
  nextSecond = millis() + 1000;
}
And we must not forget to remove delay(1000) from the end of our loop.
Our clock continues to tick each second. Our text is scrolling much faster. Too fast. We will create a separate timer to slow the scroll.
We will add scrollWait as an unsigned long member field to TrainDepature.
unsigned long scrollWait;and add in the millis() time code to scrollStops()
void scrollStops()
{
  if (millis() > scrollWait)
  {
    if (xPos > -scroll)
    {
      xPos -= 1;
    } else {
      xPos = 0;
    }
    scrollWait = millis() + 100;
  }
}
The speed of the scrolling text is now controlled by the value at the end of scrollWait(). The larger this number, the slower the scroll.
Our text scrolls constantly, jumping back to its start position without pause. This is a little jarring. To get the text to pause at the end of the movement we will need another unsigned long member field which we will name scrollReset. To pause the text before it starts scrolling we can use our scrollWait timer. A couple more if statements are required which test the position of the text and set the timers appropriately.
void scrollStops()
{
  if (millis() > scrollWait)
  {
    scrollWait = millis() + 100;
    if (xPos > -scroll)
    {
      xPos -= 1;
      scrollReset = millis() + 2000;
    } else {
      if (millis() > scrollReset)
      {
        xPos = 0;
        scrollWait = millis() + 2000;
      }
    }
  }
}
The code for the detailed departures display is complete. The sketch can now be uploaded from the Arduino IDE to the nano. You can download a copy of the completed sketch from Github here.
In the final part of the series we will look at how to run three displays from one Nano, two showing detailed departures and one showing the clock and arrivals.
Files relevant to this series
1 https://github.com/SharpSharp/ModelRailwayPID/blob/main/HCuOLED_Model_Railway_Departures_Display.ino
2 https://github.com/SharpSharp/ModelRailwayPID/blob/main/HCuOLED_Model_Railway_Clock_Display.ino
4 https://github.com/SharpSharp/ModelRailwayPID/blob/main/HCuOLED_Model_Railway_Arrivals_Display.ino
Library:
https://github.com/HobbyComponents/HCuOLEDhttp://forum.hobbycomponents.com/viewto … =58&t=1817
OR
https://forum.hobbycomponents.com/viewtopic.php?f=58&t=1817
A Note on Electronics
Development of the code for this project was completed using a Nano.
However, the final installation was completed using a Pro Mini.
The Uno would also be suitable, but obviously has a bigger footprint so use of this will be determined by your chosen installation area.
The OLED used was a white backlit module, however, Hobby Components also sell a blue backlit OLED which would also work well.