In this video I’m showing you the mLink Character LCDs which are serial (I2C/IIC) LCD displays available in either 16 column by 2 row (16×2), or 20 column by 4 row (20×4) options. Because they use a standard I2C interface they’re compatible with most microcontrollers including Arduino, they’re addressable, the address can be changed in software, and they only require 2 data pins for communication.
Unlike standard serial or parallel character displays they require no configuration or setup to use, which saves on development time and code size. Text is displayed very clearly. And the backlight’s brightness level is fully programmable.
Here’s a blog post that covers installing the library.
Arduino Connections Diagram
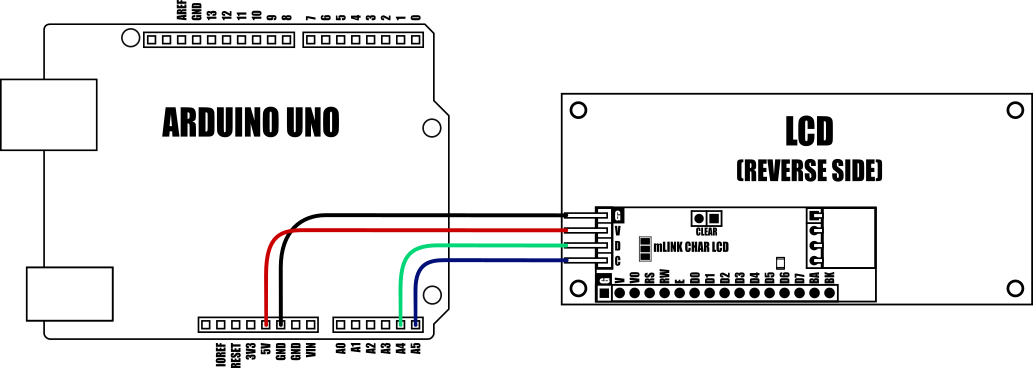
All relevant links from the video can be found below.
mLink Range on Hobby Components
mLink Characters LCDs at Hobby Components: 1602 and 2004
Hobby Components Uno Plus Development Board
Dupont Cables
mLink Character LCDs on our support forum
Raspberry Pi Users
PIP command: pip install hc-mlink
Support Forum page for Pi users
And here’s the Youtube Video
Arduino Sketch
/* FILE:    mLink_Char_LCD_Hello_World.ino
   DATE:    20/04/22
   VERSION: 1.0
   AUTHOR:  Andrew Davies


This sketch demonstrates how to print some text at a particular location on one
of the mLink character LCD modules.

Supported mLink products:

mLink 1602 Character LCD Blue (SKU: HCMODU0190A)
mLink 2004 Character LCD Blue (SKU: HCMODU0190B)

Please see Licence.txt in the library folder for terms of use.
*/


#include "mLink.h"                      // Include the library

mLink mLink;                            // Create an instance of the library

#define I2C_ADD 0x56                    // Default I2C address


void setup()
{
  mLink.init();                         // Initialise the library
}

void loop()
{
  mLink.cLCD_cursor(I2C_ADD, 5, 0);     // Set the cursor to col 5 row 0
  mLink.cLCD_print(I2C_ADD, "Hello");   // Print something


  mLink.cLCD_cursor(I2C_ADD, 5, 1);     // Set the cursor to col 5 row 1
  mLink.cLCD_print(I2C_ADD, "World");   // Print something

  while(1);
}


![Simon Says… Wanna Play a [Arduino] Game!](https://blog.hobbycomponents.com/wp-content/uploads/2024/03/BLOG-IMAGE-Simon-Says-150x150.png)


