


To compliment two of our latest product releases we have now released a brand new Arduino library for controlling WS2812 based RGB LED products. You can check out the following compatible products for this library on our website here:
Digitally controlled 8x RGB LED Light Strip (HCMODU0075)
Flexible Digitally Controlled RGB LED strips (HCOPTO0028)
Using this library you will be able to drive any number of serially controlled RGB LED’s with just one digital output pin on your Arduino. The library will cut out all the complicated timing issues associated with driving these types of LED’s so you can get straight into creating your own application for them.
Bonus feature!
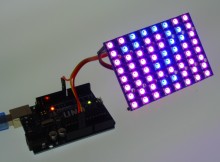
Not content with making it easy for you to drive these LED’s, we thought we would add a cool extra feature to the library – allowing you to create a full colour message display by arranging the LED’s in an 8 row grid:

Image showing 8 modules (HCMODU0075) connected in series. Note: if driving multiple modules at full brightness and external 5V power supply may be required.
The library contains an 8 bit font and commands to print easily scrollable strings of alphanumeric text!
It currently supports ATMega328 Arduinos such as the Uno, Nano, 5V Pro Mini, ATMega25060 based Arduinos such as the Mega, and ATmega32U4 based Arduinos such as the Leonardo and 5V pro mini.
You will need to download (please log in to download the library) and unzip this library to the Arduino development environments library area.
On Windows:Â
My Documents\Arduino\libraries\
On Mac:Â
Documents/Arduino/libraries/
or similarly for Linux.
A few considerations when using this library
1) Before using the library, to save memory and processor cycles, you should edit the following lines in the HCWS2812.h header file found within the library folder:
#define NUMBEROFLEDS 200
2) By default this is set to 200. Change this to match the number of LED’s you intend to drive. If you are going to be using the print functions to drive a message display then you should make sure this number is a multiple of 8 otherwise your sketch will not work.
3) If you just want to drive a strip of LED’s and don’t need the print functions you can save some program memory by commenting out the following line in the HCWS2812.h header file:
#define DOTMATRIX
Change to this:
//#define DOTMATRIX
4) Timing constraints for writing to the LEDs is very strict and so to ensure correct timing, interrupts are disabled whilst the LEDs are being written to. Therefore, anything relying on interrupts will not work correctly whilst the Refresh function is executed.
Using the library
To use the library just include the HCWS2812.h header file and create an instance of the library. E.g:
[cpp]
#include <HCWS2812.h>
HCWS2812Â HCWS2812;
[/cpp]
The library will create an array called RGBBuffer[RED/GREEN/BLUE][INTENSITY] which stores the brightness settings (0 to 255) for each red, green, and blue element of each LED. Issuing a refresh command will write the contents of this buffer to the LEDs. So for example if you wish to set the first LED in the chain to red you would do the following:
[cpp]
RGBBuffer[RED][0]Â =Â 255;Â // Sets first LEDs red element to maximum brightness (255)</span>
RGBBuffer[GREEN][0]Â =Â 0;Â // Sets first LEDs green element to minimum brightness (0)</span>
RGBBuffer[BLUE][0]Â =Â 0;Â // Sets first LEDs blue element to minimum brightness (0)</span>
[/cpp]
To set the thirteenth LED to white you would do the following:
[cpp]RGBBuffer[RED][12]Â =Â 255;Â // Sets first LEDs red element to maximum brightness (255)</span>
RGBBuffer[GREEN][12]Â =Â 255;Â // Sets first LEDs green element to maximum brightness (255)</span>
RGBBuffer[BLUE][12]Â =Â 255;Â // Sets first LEDs blue element to maximum brightness (255)</span>
[/cpp]
The following functions are available with this library:
[cpp]HCWS2812.SetBG(R, G, B);[/cpp]
Sets the default background colour for the LEDs. This will be the colour the LEDs will default to when the RGBBuffer is cleared. Where:
R sets the intensity of the RED element. Valid values are between 0 (off) and 255 (maximum).
G sets the intensity of the GREEN element. Valid values are between 0 (off) and 255 (maximum).
B sets the intensity of the BLUE element. Valid values are between 0 (off) and 255 (maximum).
[cpp]HCWS2812.ClearBuffer();[/cpp]
Clears the contents of the RGBBuffer with the background colour set by SetBG();
[cpp]HCWS2812.Refresh();[/cpp]
Updates the LEDs by writing the contents of the RGBBuffer to them. Note that interrupts are disabled whilst this command is executed.
Additional commands for creating a message display:
[cpp]HCWS2812.SetFontFG(R, G, B);[/cpp]
Sets the foreground colour of text written to the RGB buffer via the print command. Where:
R sets the intensity of the RED element. Valid values are between 0 (off) and 255 (maximum).
G sets the intensity of the GREEN element. Valid values are between 0 (off) and 255 (maximum).
B sets the intensity of the BLUE element. Valid values are between 0 (off) and 255 (maximum).
[cpp]HCWS2812.SetFontBG(R, G, B);[/cpp]
Sets the background colour of text written to the RGBBuffer via the print command. Where:
R sets the intensity of the RED element. Valid values are between 0 (off) and 255 (maximum).
G sets the intensity of the GREEN element. Valid values are between 0 (off) and 255 (maximum).
B sets the intensity of the BLUE element. Valid values are between 0 (off) and 255 (maximum).
[cpp]HCWS2812.print("TEXT STRING", Offset)[/cpp]
Writes a string of text to the RGBBuffer at position starting at Offset. A value of 1 for offset starts the text at column 1, 2 will start the text from column 2 etc. Offset numbers beyond the maximum column number can be set to allow for text to be positioned beyond the ends of the display.
[cpp]HCWS2812.print>(Value, Offset)[/cpp]
Writes a positive or negative integer to the display. If negative a ‘-‘ sign will be appended to the beginning of the number. See above of description of Offset.
[cpp]HCWS2812.print(Value, Decimal_Position, Offset)[/cpp]
Writes a positive or negative integer to the display. If negative a ‘-‘ sign will be appended to the beginning of the number.
Decimal_Position allows the option to specify the position of a decimal point.
See above for description of Offset.
![]()
[cpp]
/* FILE: HCWS2812_Cylon_Example
DATE: 26/03/15
VERSION: 0.1
AUTHOR: Andrew Davies
11/03/15 version 0.1: Original version
This is an example of how to use the HCMAX7219 library to control one or more
RGB LEDS. The example will set each LED to a random colour.
To use this example connect one or more LEDs in series (Dout –> Din) and connect
the first LED’s Din pin to digital pin 8 of your Arduino.
By default the library is set to control 100 LEDs. You can change this by editing the
following line in the MCMAX7219.h header file:
#define NUMBEROFLEDS 200 <— Change this number to match the number of LEDS connected
You can download the library from the software section of our support forum here:
http://forum.hobbycomponents.com/viewforum.php?f=58
Or from Github here:
https://github.com/HobbyComponents/HCWS2812
You may copy, alter and reuse this code in any way you like, but please leave
reference to HobbyComponents.com in your comments if you redistribute this code.
This software may not be used directly for the purpose of selling products that
directly compete with Hobby Components Ltd’s own range of products.
THIS SOFTWARE IS PROVIDED "AS IS". HOBBY COMPONENTS MAKES NO WARRANTIES, WHETHER
EXPRESS, IMPLIED OR STATUTORY, INCLUDING, BUT NOT LIMITED TO, IMPLIED WARRANTIES OF
MERCHANTABILITY AND FITNESS FOR A PARTICULAR PURPOSE, ACCURACY OR LACK OF NEGLIGENCE.
HOBBY COMPONENTS SHALL NOT, IN ANY CIRCUMSTANCES, BE LIABLE FOR ANY DAMAGES,
INCLUDING, BUT NOT LIMITED TO, SPECIAL, INCIDENTAL OR CONSEQUENTIAL DAMAGES FOR ANY
REASON WHATSOEVER.
*/
/* Include the HCWS2812 library */
#include "HCWS2812.h"
/* Create an instance of the library */
HCWS2812 HCWS2812;
void setup()
{
/* Set the R,G,B background colours to zero */
HCWS2812.SetBG(0, 0, 0);
/* Clear the output buffer */
HCWS2812.ClearBuffer();
}
/* Main program */
void loop()
{
int index;
/* Step forward through each LED */
for(index = 0; index < NUMBEROFLEDS; index++)
{
HCWS2812.ClearBuffer();
RGBBuffer[RED][index] = 255;
HCWS2812.Refresh();
delay(100);
}
/* Step backward through each LED */
for(index = NUMBEROFLEDS; index; index–)
{
HCWS2812.ClearBuffer();
RGBBuffer[RED][index – 1] = 255;
HCWS2812.Refresh();
delay(100);
}
}
[/cpp]
[cpp]
/* FILE: HCWS2812_Message_Display_Example
DATE: 26/03/15
VERSION: 0.1
AUTHOR: Andrew Davies
11/03/15 version 0.1: Original version
This is an example of how to use the HCMAX7219 library to create a message display.
To use this example you will need to connect the LEDs in series (Dout –> Din) and
arrange them in columns of 8 to create your LED array. Connect the Din of the first
LED to digital pin of your Arduino.
You can create as many columns of 8 LEDs as you like but you will need to edit the
following line in the HCWS2812.h header file:
#define NUMBEROFLEDS 200 <— Change this number to match the number of LEDS connected
This value must be an multiple of 8 otherwise the print functions will not work
You can download the library from the software section of our support forum here:
http://forum.hobbycomponents.com/viewforum.php?f=58
Or from Github here:
https://github.com/HobbyComponents/HCWS2812
You may copy, alter and reuse this code in any way you like, but please leave
reference to HobbyComponents.com in your comments if you redistribute this code.
This software may not be used directly for the purpose of selling products that
directly compete with Hobby Components Ltd’s own range of products.
THIS SOFTWARE IS PROVIDED "AS IS". HOBBY COMPONENTS MAKES NO WARRANTIES, WHETHER
EXPRESS, IMPLIED OR STATUTORY, INCLUDING, BUT NOT LIMITED TO, IMPLIED WARRANTIES OF
MERCHANTABILITY AND FITNESS FOR A PARTICULAR PURPOSE, ACCURACY OR LACK OF NEGLIGENCE.
HOBBY COMPONENTS SHALL NOT, IN ANY CIRCUMSTANCES, BE LIABLE FOR ANY DAMAGES,
INCLUDING, BUT NOT LIMITED TO, SPECIAL, INCIDENTAL OR CONSEQUENTIAL DAMAGES FOR ANY
REASON WHATSOEVER.
*/
/* Include the HCWS2812 library */
#include "HCWS2812.h"
/* Create an instance of the library */
HCWS2812 HCWS2812;
void setup()
{
Serial.begin(9600);
/* Set the fonts R G B colour to white */
HCWS2812.SetFontFG(100, 100, 100);
/* Set the fonts R G B background colour to light red */
HCWS2812.SetBG(20, 0, 0);
}
/* Main program */
void loop()
{
byte index;
/* Scroll some text with random background colours */
for(index = 0; index < 160; index++)
{
/* Clear the output buffer */
HCWS2812.ClearBuffer();
/* Change the fonts background colour every 16 steps */
if (index % 16 == 0)
HCWS2812.SetFontBG(random(0,20), random(0,20), random(0,20));
/* Print some text to the output buffer */
HCWS2812.print("HOBBY COMPONENTS", index);
/* Send the contents of the output buffer to the LEDs */
HCWS2812.Refresh();
/* Wait a little before moving the text to the next position */
delay(80);
}
HCWS2812.ClearBuffer();
/* Set the fonts background colour to light green */
HCWS2812.SetFontBG(0, 20, 0);
/* Scroll an integer number */
for(index = 0; index < 64; index++)
{
HCWS2812.ClearBuffer();
HCWS2812.print(-1234, index);
HCWS2812.Refresh();
delay(80);
}
HCWS2812.ClearBuffer();
/* Set the fonts background colour to light green */
HCWS2812.SetFontBG(0, 20, 0);
/* Scroll an integer number with a decimal point
(notice a leading zero is added) */
for(index = 0; index < 80; index++)
{
HCWS2812.ClearBuffer();
HCWS2812.print(-1234, 4, index);
HCWS2812.Refresh();
delay(80);
}
}
[/cpp]
![]()
The library files can be downloaded from github here, or directly from our forum here.


I tried the moving text but the characters are not correct. The H has a one led offset on each section. What have I done wrong?
I’m not sure what could cause that. Are you using the sketch above as is and aslo, how many LED’s (pixels) tall is your display?
With this library is it possible to control 8 strips with 30 Leds each (8×30 pixel)? Thank you
Yes, we’ve tested it with one strip of 300 LEDs so that many should be fine. The only thing to note is that if you want to display text using the libraries print function the LEDs must connected in columns of 8.
I have one more question:
I would like to build an array of these with WS2812B LED strips; How do I connect the ends of each strip, starting on the right side of the first strip? Thank you
Yes the first LED in the chain needs to be at the top right corner. They then need to be laid out in columns of 8 LEDs running from right to left.
I am trying to work with an Arduino Beetle and this does not have pin 8 available, however pin 9 is there. I have tried to change the pin in the HCWS2812 library, it has made the lights turn on but they are always white. Is there something I am missing?
Try this….
Open up the HCWS2812.h header in a text editor. If you’re using Windows don’t use notepad as it will mess up the formatting, use something like notepad++.
Find the following at line number 116:
#define DOUT_PIN 0x10
and change it to:
#define DOUT_PIN 0x20
Hi Andrew,
Thanks for this, I actually figured that one out last night shortly after posting on the forums about it. It turns out that taking a while away from the keyboard helps you think clearly.
But it works great now! Thanks for the help 🙂
I plan on using a WS2812B LED strip as Daniel mentioned. Before I create the matrix, I just want to be sure…
I cut the WS2812B into strips that are 8 LEDs long. I stick them on a board as columns, and start wiring from the rightmost column at the top, where I connect the data point to the arduino. I run a jumper from the data point at the bottom of the rightmost column to the top of the adjacent column to the left. So the LEds are arranged from top to bottom, right to left order?
>I cut the WS2812B into strips that are 8 LEDs long.
Correct
>I stick them on a board as columns
Correct
> and start wiring from the rightmost column at the top, where I connect the data point to the arduino.
Correct – Connect pin 8 of your Arduino to the Din pin.
>I run a jumper from the data point at the bottom of the rightmost column to the top of the adjacent column to the left.
Correct
> So the LEds are arranged from top to bottom, right to left order?
Correct.
Hi, can I use this for a sign that is 72 wide and 16 high? I want to make a scrolling sign that is made from the 144 led strips but instead of making it with columns of 16 it would be easier to use rows of 72 I was thinking of letters being 16 leds high
The library has been tested with a maximum of 300 LEDs. In terms of software it will compile and work with a larger amount of LEDs, although in your case (1152 LEDS) you would have to use a Mega as an Uno won’t have enough memory to drive that many. Hardware-wise each LED buffers the data signal to the next LED so in theory driving that many LEDs shouldn’t be an issue. I think the only problem you may have is getting sufficient 5V power to all the LEDs as they can consume a lot of power.
Your planned layout is a problem however. The library needs the LEDs to be laid out in vertical columns of 8 if you want to use the scrolling text feature. You can of course use two rows of 8 columns but any other layout won’t work as the text will get jumbled up or be in the wrong orientation.