


Taking temperature readings with a microcontroller may seem confusing at first sight, especially if you’re new to Arduino. In this tutorial, we simplify this as much as possible. We will use an inexpensive LM35Dz temperature sensor, a few cables and an Uno.
You will need:
The sketch below will scale temperature readings into centigrade and display them in the serial monitor of the Arduino software.
Making the connections
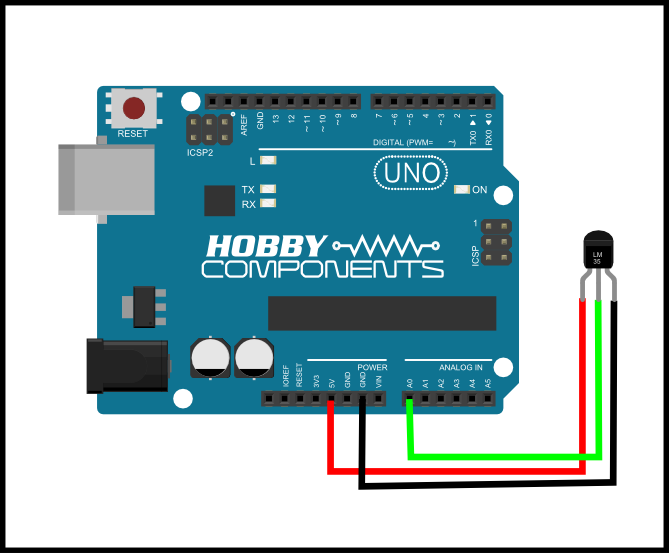
Cable one: Connect the first cable to pin 1 of the LM35DZ and the other end to the +5V Pin on your Arduino.
Cable two: Connect the second cable to pin 2 of the LM35DZ and the other end to the pin labeled A0
Cable three: Connect the third cable to pin 3 on the LM35DZ and the other end to the pin labeled GND on your Arduino.
Once all connections are made, you can go ahead and plug in your Arduino.
We now need to tell the Arduino how to process the connections you’ve just made. To do this, you’ll need to upload the sketch below. Simply copy the entire sketch and paste it into the Arduino software. Be sure you see a COM port (and of course that the right one is selected if there is more than one available).
The Sketch
Simply copy and paste the sketch below, or download it here.
[cpp]
/* FILE: HC_Exp_Kit_LM35_Temp_Sens_Example
DATE: 19/03/13
VERSION: 0.1
REVISIONS:
19/09/13 Created version 0.1
This is an example of how to use the LM35 temperature sensor found within the
Hobby Components microcontroller experimenters kit (HCKITS0013).
This example sketch reads the temperature via one of the Arduino’s analogue
pins (A0) and after scaling the reading to oC, outputs the result to the serial
port.
To connect the LM35 to an Arduino development board please follow the pinout
below:
LM35 ARDUINO
Pin 1 +5V
Pin 2 A0
Pin 3 GND
You may copy, alter and reuse this code in any way you like, but please leave
reference to HobbyComponents.com in your comments if you redistribute this code.
This software may not be used directly for the purpose of selling products that
directly compete with Hobby Components Ltd’s own range of products.
THIS SOFTWARE IS PROVIDED "AS IS". HOBBY COMPONENTS MAKES NO WARRANTIES, WHETHER
EXPRESS, IMPLIED OR STATUTORY, INCLUDING, BUT NOT LIMITED TO, IMPLIED WARRANTIES OF
MERCHANTABILITY AND FITNESS FOR A PARTICULAR PURPOSE, ACCURACY OR LACK OF NEGLIGENCE.
HOBBY COMPONENTS SHALL NOT, IN ANY CIRCUMSTANCES, BE LIABLE FOR ANY DAMAGES,
INCLUDING, BUT NOT LIMITED TO, SPECIAL, INCIDENTAL OR CONSEQUENTIAL DAMAGES FOR ANY
REASON WHATSOEVER.
*/
/* Define the analogue pin used to read the temperature sensor (A0) */
#define LM35Pin 0
/* Stores the current temperature reading */
float Temperature;
void setup()
{
Serial.begin(9600);
/* Set the analogue reference used by the ADC inputs
to the internal 1.1V reference */
analogReference(INTERNAL);
}
/* Main Program */
void loop()
{
/* Read the analogue pin and scale the reading to degrees centigrade
(10mV per oC / (1.1V Int Ref / 1024 ADC resolution)) */
Temperature = analogRead(LM35Pin) / 9.31;
Serial.print("Current temperature (oC): ");
Serial.println(Temperature);
/* Wait 1 second before reading again */
delay(1000);
}
[/cpp]
Hit the upload button.
Now, in the Arduino software, go to Tools > Serial Monitor. This brings up a new window which will show the readings being read by the LM35DZ.
Hold the LM35DZ between your fingers for a moment and watch as the temperature rises.
It may seem like a simple application, but  don’t forget that this is just a starting point. There are so many sensors, for so many applications, that the possibilities are endless.


Hi, just a heads up that there is an article in this months EPE concerning LM35’s.
Also useful: these can sometimes be found on certain routers and other electronics.