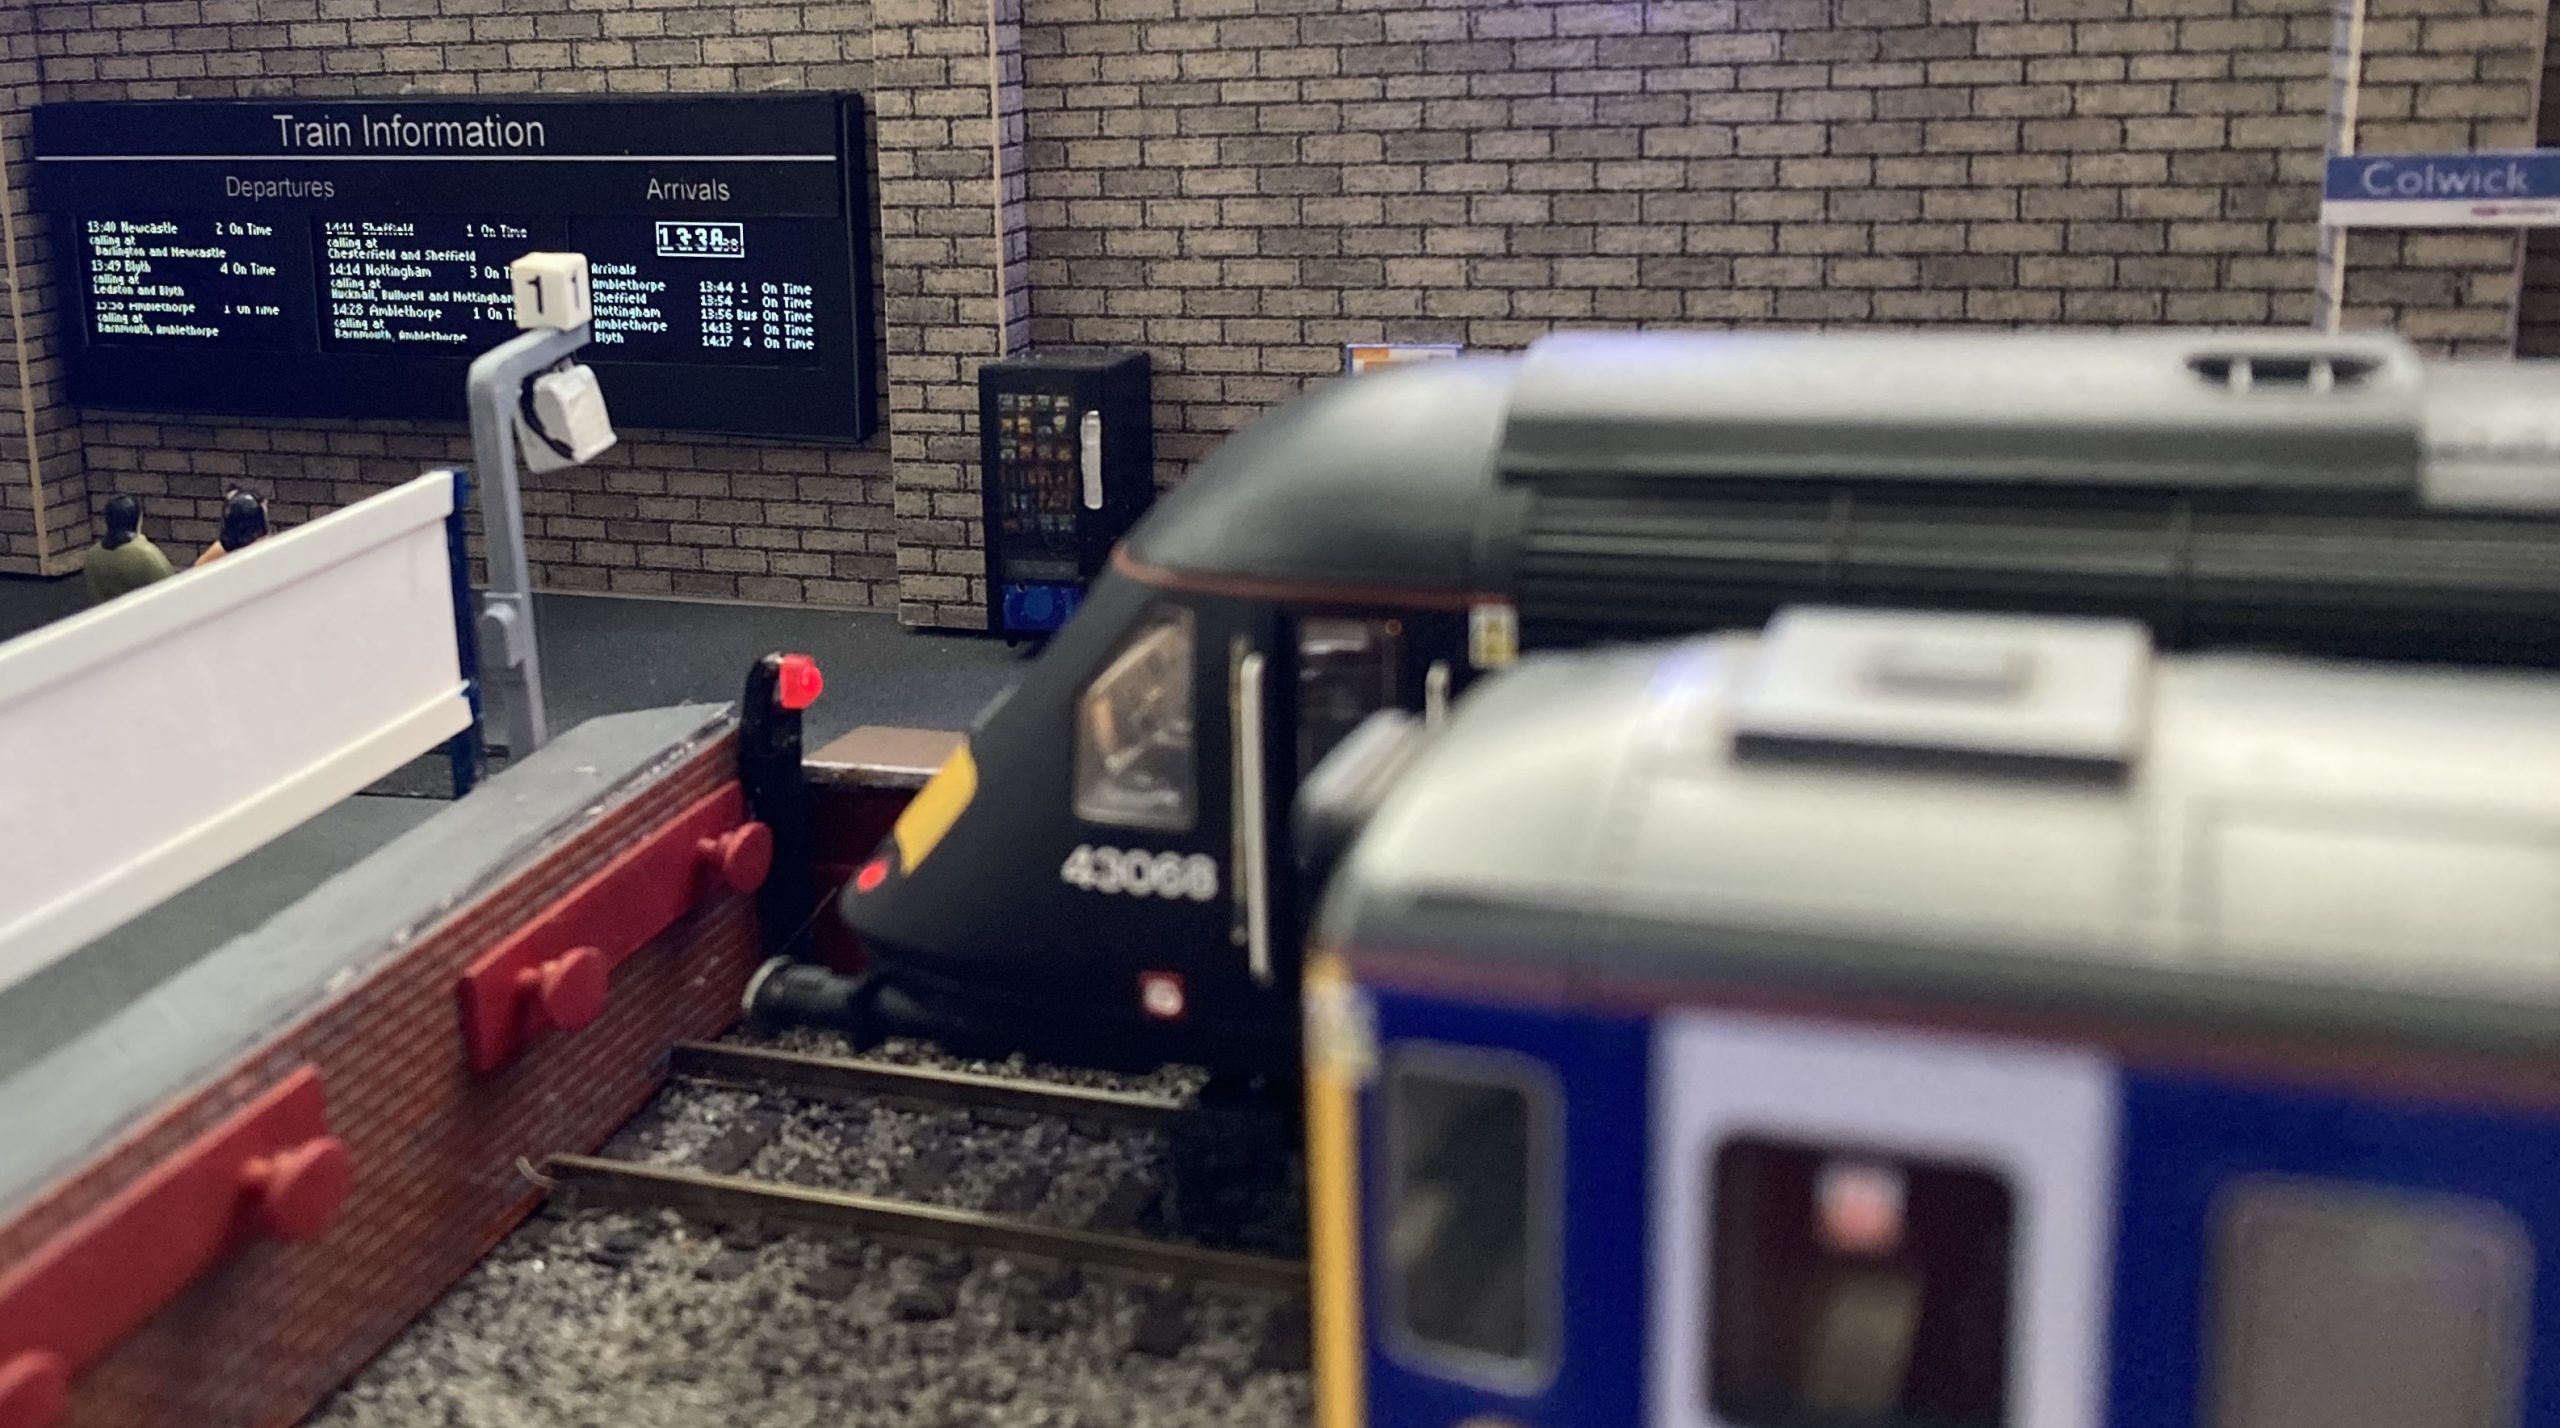
We continue our series looking at how to use a SSD1306 128×64 pixel OLED display module on a model railway. In this part we will be making an Arrivals board.
The information we need for arrivals is very similar to that for our departures board. We will be adapting the departures code to create the arrivals. If you haven’t read the previous parts of this series you may want to go back and start at the beginning.
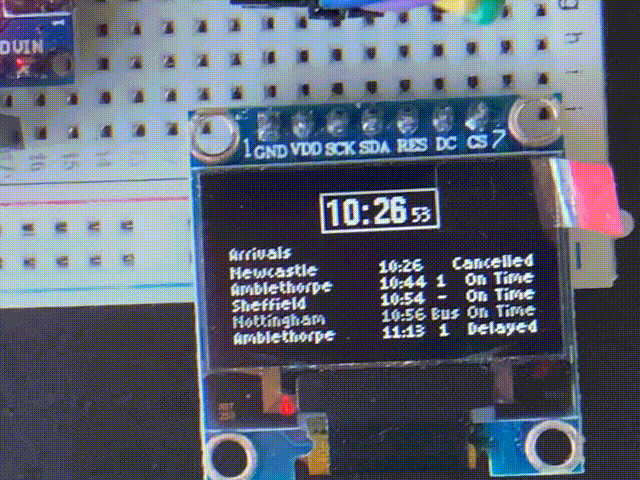
As a starting point we will go back to our clock. We placed this at the top of the screen. There is plenty of room below the clock to display a list of the next few arrivals at our station so we will add them to combine the clock and the arrivals within the one screen.
We could adapt out struct TrainDeparture to deal with arrivals as well. But that may make it too complex, and we are trying to keep things simple. We will create a separate struct TrainArrival.
const byte NUMBER_OF_ARRIVALS = 6;
byte nextArrival;

struct TrainArrival
{
  byte minutes;
  byte platform;
  char *origin;
  byte hours;

  void setup()
  {
    if (minutes > m)  hours = h;
    else              hours = h+1;
    if (hours==24)    hours=0;
  }
  void update()
  {
    if (m == minutes+1)
    {
      hours += 1;
      if(hours == 24) hours = 0;
      nextArrival += 1;
      if (nextArrival == 6) nextArrival = 0;
    }
  }
};

TrainArrival arrivals[NUMBER_OF_ARRIVALS] = {
  {13, 1, "Amblethorpe"},
  {17, 4, "Blyth"},
  {26, 2, "Newcastle"},
  {44, 1, "Amblethorpe"},
  {54, 2, "Sheffield"},
  {56, 3, "Nottingham"},
};
There are a few practical changes to the TrainDeparture code compared with arrival(s) replacing departure(s). destination has changed to origin, and the test for m is increased by 1 so the train stays on the screen for a minute of its arrival.
displayDepature() gets similar Find and Replace to create displayArrival(). The structure is much the same, but the order of the information on the screen has been rearranged.
void displayArrival(byte row)
{
  const byte ROW_HEIGHT = 7;
  byte train;
  train = row + nextArrival;
  if (train >= NUMBER_OF_ARRIVALS)
  {
      train = train - NUMBER_OF_ARRIVALS;
  }
  row = row * ROW_HEIGHT;
  row = row + 30;
  HCuOLED.SetFont(sharpsharp_5pt);
  HCuOLED.Cursor(0, 22);
  HCuOLED.Print("Arrivals");

  HCuOLED.Cursor(0, row);
  HCuOLED.Print(arrivals[train].origin);

  HCuOLED.Cursor(64, row);
  if (arrivals[train].hours>9)
  {
    HCuOLED.Print(arrivals[train].hours);
  } else if (arrivals[train].hours==0)
  {
    HCuOLED.Print("00");
  } else {
    HCuOLED.Print("0");
    HCuOLED.Cursor(68, row);
    HCuOLED.Print(arrivals[train].hours);
  }

  HCuOLED.Cursor(72, row);
  HCuOLED.Print(":");

  HCuOLED.Cursor(74, row);
  if (arrivals[train].minutes>9)
  {
    HCuOLED.Print(arrivals[train].minutes);
  } else if (arrivals[train].minutes==0)
  {
    HCuOLED.Print("00");
  } else {
    HCuOLED.Print("0");
    HCuOLED.Cursor(79, row);
    HCuOLED.Print(arrivals[train].minutes);
  }

    HCuOLED.Cursor(88, row);
    HCuOLED.Print(arrivals[train].platform);

    HCuOLED.Cursor(100, row);
    HCuOLED.Print("On Time");
}
The setup() and loop() are similar to the code from Part 3. Again we Find departure and Replace with arrival.
void setup()
{
  /* Reset the display */
  HCuOLED.Reset();
  for (int i = 0; i < NUMBER_OF_ARRIVALS; i++)
  {
    arrivals[i].setup();
  }
  for (int i = 0; i < NUMBER_OF_ARRIVALS; i++)
  {
    if (arrivals[i].minutes > m)
    {
      nextArrival = i;
      break;
    }
  }
}
void loop()
{
  HCuOLED.ClearBuffer();
  for (int i = 0; i < NUMBER_OF_ARRIVALS; i++)
  {
    displayArrival(i);
  }
  displayClock();
  HCuOLED.Refresh();

  s=s+1;
  if(s==60)
  {
    s=0;
    m=m+1;
    arrivals[nextArrival].update();
  }
  if(m==60)
  {
    m=0;
    h=h+1;
  }
  if(h==24) h=0;

 delay(1000);
}
Reusing our code has enabled us to create our Arrivals board simply and quickly. Here’s the code for the full sketch of a dynamic clock and arrivals display.
#include "HCuOLED.h"
#include "SPI.h"

 // These connect to the CS, DC, and RST pins on the display.

#define CS_DI 10
#define DC_DI 9
#define RST_DI 8

const byte NUMBER_OF_ARRIVALS = 6;
byte nextArrival;

/* clock stuff */
byte h=20;
byte m=23;
byte s=45;

/* Create an instance of the library for the display */
HCuOLED HCuOLED(SSD1306, CS_DI, DC_DI, RST_DI);

struct TrainArrival
{
  byte minutes;
  byte platform;
  char *origin;
  byte hours;

  void setup()
  {
    if (minutes > m)  hours = h;
    else              hours = h+1;
    if (hours==24)    hours=0;
  }
  void update()
  {
    if (m == minutes+1)
    {
      hours += 1;
      if(hours == 24) hours = 0;
      nextArrival += 1;
      if (nextArrival == 6) nextArrival = 0;
    }
  }
};

TrainArrival arrivals[NUMBER_OF_ARRIVALS] = {
  {13, 1, "Amblethorpe"},
  {17, 4, "Blyth"},
  {26, 2, "Newcastle"},
  {44, 1, "Amblethorpe"},
  {54, 2, "Sheffield"},
  {56, 3, "Nottingham"},
};

void displayArrival(byte row)
{
  const byte ROW_HEIGHT = 7;
  byte train;
  train = row + nextArrival;
  if (train >= NUMBER_OF_ARRIVALS)
  {
      train = train - NUMBER_OF_ARRIVALS;
  }
  row = row * ROW_HEIGHT;
  row = row + 30;
  HCuOLED.SetFont(sharpsharp_5pt);
  HCuOLED.Cursor(0, 22);
  HCuOLED.Print("Arrivals");

  HCuOLED.Cursor(0, row);
  HCuOLED.Print(arrivals[train].origin);

  HCuOLED.Cursor(64, row);
  if (arrivals[train].hours>9)
  {
    HCuOLED.Print(arrivals[train].hours);
  } else if (arrivals[train].hours==0)
  {
    HCuOLED.Print("00");
  } else {
    HCuOLED.Print("0");
    HCuOLED.Cursor(68, row);
    HCuOLED.Print(arrivals[train].hours);
  }

  HCuOLED.Cursor(72, row);
  HCuOLED.Print(":");

  HCuOLED.Cursor(74, row);
  if (arrivals[train].minutes>9)
  {
    HCuOLED.Print(arrivals[train].minutes);
  } else if (arrivals[train].minutes==0)
  {
    HCuOLED.Print("00");
  } else {
    HCuOLED.Print("0");
    HCuOLED.Cursor(79, row);
    HCuOLED.Print(arrivals[train].minutes);
  }

    HCuOLED.Cursor(88, row);
    HCuOLED.Print(arrivals[train].platform);

    HCuOLED.Cursor(100, row);
    HCuOLED.Print("On Time");
}
void displayClock()
{
  byte col = 42;
  byte row = 2;

  HCuOLED.Rect(col-2, row-2, col+47, row+14, OUTLINE);
  HCuOLED.SetFont(MedProp_11pt);

  /* display hours   */
  HCuOLED.Cursor(col, row);
  if (h>9)
  {
    HCuOLED.Print(h);
  } else if (h==0)
  {
    HCuOLED.Print("00");
  } else {
    HCuOLED.Print("0");
    HCuOLED.Cursor(col+7, row);
    HCuOLED.Print(h);
  }
  HCuOLED.Cursor(col+16, row);
  HCuOLED.Print(":");

  /* display minutes */
  HCuOLED.Cursor(col+20, row);
  if (m>9)
  {
    HCuOLED.Print(m);
  } else if (m==0)
  {
    HCuOLED.Print("00");
  } else {
    HCuOLED.Print("0");
    HCuOLED.Cursor(col+27, row);
    HCuOLED.Print(m);
  }

  /* display seconds */
  HCuOLED.SetFont(sharpsharp_6pt);
  HCuOLED.Cursor(col+37, row+6);
  if (s>9)
  {
    HCuOLED.Print(s);
  } else if (s==0)
  {
    HCuOLED.Print("00");
  } else {
    HCuOLED.Print("0");
    HCuOLED.Cursor(col+42, row+6);
    HCuOLED.Print(s);
  }
}
void setup()
{
  /* Reset the display */
  HCuOLED.Reset();
  for (int i = 0; i < NUMBER_OF_ARRIVALS; i++)
  {
    arrivals[i].setup();
  }
  for (int i = 0; i < NUMBER_OF_ARRIVALS; i++)
  {
    if (arrivals[i].minutes > m)
    {
      nextArrival = i;
      break;
    }
  }
}
void loop()
{
  HCuOLED.ClearBuffer();
  for (int i = 0; i < NUMBER_OF_ARRIVALS; i++)
  {
    displayArrival(i);
  }
  displayClock();
  HCuOLED.Refresh();

  s=s+1;
  if(s==60)
  {
    s=0;
    m=m+1;
    arrivals[nextArrival].update();
  }
  if(m==60)
  {
    m=0;
    h=h+1;
  }
  if(h==24) h=0;

 delay(1000);
}
Creating Problems
We achieved what we wanted. However, we can make our display more realistic by having some of our trains delayed or cancelled.
Before we do this, there is one unseen error that needs attention. Our code is displaying 6 arrivals, but only 5 are appearing on the screen. The 6th row is being printed off the bottom of the display. To stop this happening we will only display 5 rows. Rather than creating a row for each of our NUMBER_OF_ARRIVALS we will have a new byte variable arrivalRows which we will initialise as 5.
byte arrivalRows = 5;When we call the displayArrival() function in the loop() we replace NUMBER_OF_ARRIVALS with arrivalRows
 for (int i = 0; i < arrivalRows; i++)
 {
   displayArrival(i);
 }
This change allows us to display equal or fewer number of arrivals than we have in our timetable. If you try to display more rows than there are trains, then trains will be repeated on the extras rows.
We are going to enable our trains to be delayed, cancelled, arrived, not have a platform number, and the dreaded Bus Replacement Train Service.
To enable this we will add a state member field to our TrainArrival struct and use this to allocate our train as delayed cancelled etc. I’ve snipped the functions code out here to improve readability.
struct TrainArrival
{
  byte minutes;
  byte platform;
  char *origin;
  byte state;
  byte hours;

  void setup()
  {… snip …}

  void update()
  {… snip …}

};
We add in state before hours. This is to allow us to include a state when we first create each of the arrivals.
state is a byte so it will store a number. We will use numbers as follows
- 0 to represent an On Time train
- 1 for a Cancelled train
- 2 for a train once it has arrived
- 3 for a trains who platform is unknown
- 4 when a train is delayed
- 5 when as train is replaced by a bus
Remembering which number represents which state is going to lead to confusion and errors. To avoid this we will define these numbers as words to make our code a lot easier to write, read and more importantly, understand.
#define onTime 0
#define cancelled 1
#define arrived 2
#define noPlatform 3
#define delayed 4
#define bus 5
These need to be defined before we use them. They are placed at the top of the sketch with the other #define statements.
We can set the state of our arrivals when we create them by adding a state value when we instantiate them.
TrainArrival arrivals[NUMBER_OF_ARRIVALS] = {
  {13, 1, "Amblethorpe", delayed},
  {17, 4, "Blyth"},
  {26, 2, "Newcastle", cancelled},
  {44, 1, "Amblethorpe"},
  {54, 2, "Sheffield", noPlatform},
  {56, 3, "Nottingham", bus},
};
We haven’t set up a state for all of our trains. Where we haven’t the trains will have a default value of 0 which is onTime.
So far the data entered into the arrivals objects when created has remained the same and we have updated the hours value to keep our display in step with our clock. We don’t want the same services to always be the one which is cancelled or delayed. That would be unrealistic and very unfair on our passengers from Nottingham who would forever be on a bus.
We are going to update the state of our arrivals after they arrive and are removed from the screen. When they reappear for the next hour, their state will have randomly changed.
We can add this functionality into our TrainArrival member function update(). This function is called from the loop() once each minute for the nextArrival
We need a random number. We declare this at the start of update()
byte randNumber;
randNumber = random(10);
Our random number will be between 0 and 9, inclusive. This means each number has a 10% chance of being picked. We can use one or more of these numbers to create the odds of a train being cancelled or delayed. 0 has a 10% chance. Greater than 5 has a 40% chance. We will add some if statements to update() to change the state.
void update()
{
  byte randNumber;
  randNumber = random(10);
  if (m == minutes+1)
  {
    state = onTime;
    if(randNumber >= 6) state = noPlatform;
    if(randNumber == cancelled) state = cancelled;
    if(randNumber == bus) state = bus;
    if(randNumber == delayed) state = delayed;

    hours += 1;
    if(hours == 24) hours = 0;
    nextArrival += 1;
    if (nextArrival == 6) nextArrival = 0;
  }
}
There are a couple more features that we can implement in update(). When a train has a noPlatform state the platform number will be replaced by a dash (-) on the screen. To ensure that it does have a platform number displayed, before its arrival we will change its state to onTime, this is when it becomes the next arrival.
We want some of our trains to display as arrived. onTime trains will have a 50% chance of arriving one minute early.
void update()
{
  byte randNumber;
  randNumber = random(10);
  if (m == minutes-1)
  {
    if (state == onTime)
    {
      if (randNumber < 5)
      {
        state = arrived;
      }
    }
  }
  if (state == noPlatform) state = onTime;

  if (m == minutes+1)
  {
    state = onTime;
    if(randNumber >= 6) state = noPlatform;
    if(randNumber == cancelled) state = cancelled;
    if(randNumber == bus) state = bus;
    if(randNumber == delayed) state = delayed;

    hours += 1;
    if(hours == 24) hours = 0;
    nextArrival += 1;
    if (nextArrival == 6) nextArrival = 0;
  }
}
Displaying Problems
Our delays, cancellations and the like only impact the last two columns of our display, the platform number and, what up to now has shown as On Time. We will modify the code of our displayArrival function for these two columns.
The platform column can now show a dash (-) if the train state is noPlatform and Bus for a state of bus. If the train is cancelled, the column will be left blank. If statements control what should be printed to the screen.
if (arrivals[train].state != cancelled)
{
  HCuOLED.Cursor(88, row);
  if (arrivals[train].state == noPlatform)
  {
    HCuOLED.Print("-");
  } else if (arrivals[train].state == bus)
  {
    HCuOLED.Cursor(85, row);
    HCuOLED.Print("Bus");
  } else
  {
    HCuOLED.Print(arrivals[train].platform);
  }
}
The train status column will now show Cancelled, Arrived or Delayed for those states. For the other states of bus, noPlatform and onTime it will show On Time.
if (arrivals[train].state == cancelled)
{
  HCuOLED.Cursor(95, row);
  HCuOLED.Print("Cancelled");
} else if (arrivals[train].state == arrived)
{
  HCuOLED.Cursor(104, row);
  HCuOLED.Print("Arrived");
} else if (arrivals[train].state == delayed)
{
  HCuOLED.Cursor(100, row);
  HCuOLED.Print("Delayed");
} else
{
  HCuOLED.Cursor(100, row);
  HCuOLED.Print("On Time");
}
That completes the code for our Arrivals board. Upload the sketch to your nano. It is now a lengthy sketch, download a copy from Github here if you would like to see the full code.
https://github.com/SharpSharp/ModelRailwayPID/blob/main/HCuOLED_Model_Railway_Arrivals_Display.ino
Remember that you can speed up the clock on the display by reducing the delay from 1000 ms to 100, or even 10 if you want a very fast clock.
You can alter the sketch for the Departures Display in a similar way to create the same realism. However, we won’t make those changes to our departures sketch. When we return to it in Part 5 of this series, our focus will be on displaying the stations each train calls at on the way to it’s final destination.
Files relevant to this series
1 https://github.com/SharpSharp/ModelRailwayPID/blob/main/HCuOLED_Model_Railway_Departures_Display.ino
2 https://github.com/SharpSharp/ModelRailwayPID/blob/main/HCuOLED_Model_Railway_Clock_Display.ino
4 https://github.com/SharpSharp/ModelRailwayPID/blob/main/HCuOLED_Model_Railway_Arrivals_Display.ino
Library:
https://github.com/HobbyComponents/HCuOLEDhttp://forum.hobbycomponents.com/viewto … =58&t=1817
OR
https://forum.hobbycomponents.com/viewtopic.php?f=58&t=1817
A Note on Electronics
Development of the code for this project was completed using a Nano.
However, the final installation was completed using a Pro Mini.
The Uno would also be suitable, but obviously has a bigger footprint so use of this will be determined by your chosen installation area.
The OLED used was a white backlit module, however, Hobby Components also sell a blue backlit OLED which would also work well.